Showing posts with label South Indian. Show all posts

Friday, May 1, 2020

Fish Fry


Fish Fry - a dish I first tried during one of my stays in Yercaud. It was a river fish with so many bones and I had no clue how to eat it. Over the years got to know the difference between a river fish and a sea fish and began to start liking the sea fish - simply because it had less bones to take care of. :) Of course not every fish is suitable for a cutlet for a shallow fry.  Some that I liked are King fish, Cat fish, Barramundi and now Rainbow Trout. So here it comes - a shallow fried Fish Fry.


Ingredients
  1. Fish cutlets (we used Rainbow Trout) - 1.5 kg
  2. Ginger garlic paste - 1 table spoons
  3. Kashmiri chilli powder - 1 tea spoon
  4. Black pepper powder - 1/2 tea spoon
  5. Curry leaves (finely chopped) - 1 table spoon
  6. Corn flour - 2 tea spoons
  7. Lemon juice -  2 table spoons
  8. Salt - to taste
  9. Vegetable oil - 1/2 cup

Method

  1. Create a paste with all the ingredients with a little bit of water.
  2. Marinade the fish in the paste for about 1 hour.
  3. In a wide and deep grill / tava pour any vegetable oil for about enough to cover the entire base for up to 1/2 inch height.
  4. After the oil is hot shallow fry the marinaded fish pieces in low flame.
  5. Turn after 4 to 5 minutes and cook for another 5 minutes.
  6. Rest it on a paper towel to remove excess oil.

Enjoy !!

C

Tuesday, April 7, 2020

Vaangi Bath which can also be called as Brinjal (Egg Plant) Pulao was first introduced to me by a good old friend Aravind Swami (no not the actor) during my initial stint at the Portland short term boys "hostel". Brinjal was not necessarily my favourite vegetable to consume then, but with Vaangi Bath it turned around in my taste buds. This is one of the top contributions from the Kannadiga food specialities. Am sure there are plenty of ready made store mixes for the masala (MTR being my favourite), it definitely adds flavour when made fresh at home. So here it comes ladies and gentlemen.... 

Ingredients

Masala

  1. Kashmiri red chilli - 3 or 4
  2. Urad dal - 2 teaspoons
  3. Chana dal - 2 teaspoons
  4. Methi / Fenugreek seeds - 1/2 tea spoon
  5. Coriander seeds - 2 tablespoons
  6. Poppy seeds / khas khas - 1 teaspoon
  7. Cinnamon stick - 1 inch
  8. Green Cardamom / Elaichi - 3 or 4
  9. Cloves - 4 or 5
  10. Desicated coconut - 2 table spoons
  11. Roasted peanuts - 2 table spoons
Vangi Bath
  1. Steamed (pressure cooked) rice - Basmati / Sona masoori - 2 cups (before steaming)
  2. Brinjal / Egg plant - 500 gms (diced in 1 inch cubes)
  3. Onion - 1 (thinly sliced)
  4. Red chillies - 3 or 4
  5. Turmeric powder - 1/2 tea spoon
  6. Kashmiri chilli powder - 1 tablespoon
  7. Vangi bath Masala - 2 - 3 tablespoons
  8. Tamarind water - 1/4  to 1/2 cup
  9. Curry leaves - 1 or 2 twigs
  10. Mustard seeds - 1 teaspoon
  11. Vegetable based oil - 4-5 table spoons 
  12. Ghee - 1 table spoon

Method
  1. Dry roast the ingredients of the masala - preferably one at a time. If you are running out of patience feel free to do all of them but keep the poppy seeds, peanuts  and coconut to the end.
  2. Let it cool down to room temperature and grind it to a smooth powder.
  3. Heat a large kadai add some generous (4-5 table spoons) of any vegetable oil.
  4. When hot temper it with mustard seeds until they crackle.
  5. Add the red chillies with curry leaves and saute for a few seconds.
  6. Add the sliced onions and saute until translucent.
  7. Add the tamarind water and bring the mixture to a boil.
  8. Add the diced egg plant along with turmeric and salt to taste and saute until the egg plants have become soft.
  9. Add the powdered Vangi bath masala. Exercise caution if you are not a big fan of spicy food.
  10. Mix well until oil separates. 
  11. Taste the mixture for spicyness and salt. It should be just be just a saltier than what your taste buds would like.
  12. Mix the steam rice well so that the mixture is blended evenly.
  13. Finally add the ghee and mix it well.
Serve hot.

Enjoy!!

C
Sunday, April 5, 2020

Mutton Chops


Mutton - a meat that I had avoided for a very long time for whatever reasons. I was not a big fan of the gamy flavour. However I got to understand recently that if done well you can camouflage the flavour with the right spices. These days we started making it more frequently for it's iron content apparently good for the ladies in the family. So here's a recipe for a semi-gravy type chops which is a huge hit at home.

Ingredients

Mutton Masala

  1. Coriander - 2 table spoons
  2. Cumin Seeds - 1 tea spoon
  3. Fennel Seeds - 1 tea spoon
  4. Cinnamon sticks - 2
  5. Cloves - 6
  6. Bay leaf - 1
  7. Red chillies - 4
  8. Small star anise - 1
  9. Poppy seeds - 1 table spoon


Chops

  1. Diced Mutton with bone - 1kg
  2. Diced Onions - 2
  3. Garlic - 2 cloves
  4. Shallots - 3
  5. Tomato (small) - 2
  6. Ginger/Garlic paste - 2 table spoon
  7. Cumin seeds  - 1 tea spoon
  8. Fennel seeds - 1 tea spoon
  9. Coriander leaves
  10. Curry leaves
  11. Red Chilli powder - to taste
  12. Black pepper powder
  13. Lemon juice - 1 table spoon
  14. Turmeric powder - 1 pinch
  15. Green chillies - 2
  16. Mustard seeds
  17. Coriander powder - 2 tea spoons


Method
  1. Pressure cook the mutton with turmeric, salt and 2 cloves of garlic for about 7 or 8 whistles.
  2. While it is being pressure cooked, dry roast the ingredients of the masala and let it to cool down.
  3. Saute mustard seeds, fennel and cumin seeds.
  4. Saute onions and green chillies until onions turn translucent.
  5. Add tomatoes and saute until oil separates.
  6. While you wait for the saute to complete grind the roasted masala to a fine powder.
  7. Add ginger garlic and saute until oil separates.
  8. Add coriander powder and the masala and mix well.
  9. Filter the mutton from the pressure cooker and add the pieces.
  10. Use the water used from the pressure cooker to the consistency needed. 
  11. Add salt to taste.
  12. Saute for about 15 minutes.
  13. Add lemon juice and pepper powder and mix well.
  14. Garnish with coriander leaves and curry leaves and serve hot.
Enjoy
C

Tuesday, October 24, 2017

Mundiri Cake a.k.a. Cashew Cake / Slice

Hope you all had a great Deepavali / Diwali!! Mundiri (Cashew) cake is one of my favourite childhood desserts that I have relished from don't know when. Later on over the years I got introduced to the North Indian version of it known as Kaju (Cashew) Katli (Slice). This is one dish that could be called in many names Cake / Slice / Katli / Barfi - what not. As they say rose is a rose is a rose - and so is Mundiri Cake. While it has many names, forms and recipes, here's my own -  mixing a bit of my mom's recipe with some found on the internet. It's a fairly simple but a long process. Hope you could try it out for your next event. Wait - you don't really need an event for this one. Just do it. :)

Ingredients:


  1. Cashews - 2 cups
  2. Sugar (I used raw sugar) - 3.5 cups
  3. Milk - 2 cups
  4. Ghee (Clarified Butter) - 1/2 cup
  5. Nutmeg powder - 1-2 teaspoons
Note: You can add more or less cashews but make sure the ratios are kept intact.

The Method:

  1. Grind the cashews in a food processor - preferably using the pulse option. (I saw somewhere that a normal blend turns it into a paste.) Make sure not all of it is smoothly ground and leave a bit of chunkiness for the texture.
  2. In a large (thick) sauce pan mix the ground cashews, sugar, milk and nutmeg until all blended well.
  3. Boil the mix under low flame until the milk evapourates while stirring the mix with a spoon (preferably wooden) constantly. This is to ensure that there are no lumps formed none of the mixture gets burnt. This is the most time consuming step of this recipe and could take a good 20 - 30 minutes depending on the quantity.
  4. Stop the process when the mix is still in flowing consistency but separates easily from the vessel. Almost like an oats porridge consistency if that could be a reference.
  5. Remove the pan from the heat and mix the ghee into it until it gets mixed evenly. You might see some ghee oozing out - which means its excessive and you can carefully drain it out.
  6. Grease a deep tray with ghee - preferably rectangle or square in shape and pour the mix into the tray.
  7. Leave it to cool for a minute or 2 and draw lines diagonally to make diamond shaped slices.
  8. Let it cool for about 5-10 minutes and slice it up using a sharp knife. Do not leave it for too long else the slices will get brittle (as in the pic below).
  9. Soft and chunky Mundiri cake ready to be served. It can be boxed and stored for up to 10 days. I prefer not to refrigerate desserts since it would require reheating and it may not have the same taste.
Enjoy!!

C


Monday, September 11, 2017

Ennai Kathirikaai Kuzhambu - Fried Brinjal Curry

Kathirikaai or Eggplant or Brinjal as it is called in various parts of the world is one of those vegetables that renders itself to many different dishes. I still remember during my younger days avoiding this vegetable (technically a fruit) as much as I can. It has a very distinct taste - which I believe to be an acquired one. I don't remember eating Ennai Kathirikaai as a main dish ever. It usually comes in as part of a "south indian"" thaali meal.  As the name suggests there's going to be a lot of oil involved - beware. There were quite a few variations in the way this was prepared as described in the various Youtube videos and blogs. So here is mine a mix of a few versions. Hopefully you would like this one.


Ingredients

Main

  1. Eggplant - preferably the small ones. In case you don't have the small one, you can dice it up in large pieces. (6-8 pieces)
  2. Shallots - leave it whole if they are the small varieties. If they are the big ones as we get in regular grocery stores you can either quarter / halve it depending on the size. (5-6)
  3. Mustard seeds - 1 teaspoon
  4. Curry leaves - approximately 15-20 leaves
  5. Dried Red Chillies - 4-5
  6. Tamarind water - 1/2 cup
  7. Jaggery  (can be substituted with brown sugar or just plain sugar) - 2 tablespoons
Marinade
  1. Turmeric powder - 1 teaspoon
  2. Chilli powder - 2-3 teaspoons
  3. Coriander powder - 2-3 tablespoons 
  4. Salt - 1 teaspoons
  5. Tamarind water - 2-3 tablespoons
Wet Masala
  1. Onions - 2 large red onions
  2. Tomatoes - 2
  3. Turmeric powder - 2 teaspoons
  4. Chilli powder - 1 tablespoon
  5. Coriander powder - 2-3 tablespoons
  6. Ginger garlic paste - 2 tablespoons
  7. Cumin seeds - 1 tablespoon
  8. Fennel seeds - 1 tablespoon
The Method

  1. Wash and remove the stems of the brinjals leaving the crown intact. Take caution with the stems as it could be a bit spiky.
  2. Create a fairly paste with the ingredients of the marinade (turmeric powder, chilli powder, coriander powder, salt, tamarind water and bit of more water.
  3. Slit the brinjals on the smooth side as a cross to open them up a bit.
  4. Apply the marinade into the slits and also cover the skin and let it rest for about 10 minutes (or until you complete the next few steps - until #10).
  5. In a large kadai / sauce pan heat a few tablespoons of vegetable oil.
  6. Saute the onions until they are translucent.
  7. Add the ginger garlic paste and saute for a few minutes.
  8. Add turmeric powder, chilli powder and coriander powder and saute until the spices mix well.
  9. Add the tomatoes and saute until the tomato becomes soft and mushy.
  10. Add the fennel seeds and cumin seeds mix it well and take it off the stove.
  11. Let this cool down to room temperature.
  12. In the same pan add about half a cup of oil - enough to shallow fry all the brinjals.
  13. Once the oil has heated up shallow fry the brinjals until the skin turns brownish c
    olour. Take caution to do this under medium to low heat to avoid the brinjals getting burnt.
  14. Blend the ingredients of the sauteed wet masala into a smooth paste.
  15. In the same sauce pan add the mustard seeds and let it splutter.
  16. Add the curry leaves, dried red chillies and and shallots and saute for a few minutes.
  17. Add the blended wet masala paste and saute until oil separates - which is usually about 10 minutes.
  18. Add salt to taste.
  19. Add a few table spoons of the tamarind water and about a tablespoon of Jaggery and bring it to boil. Ensure the jaggery is dissolved and mixed well.
  20. Add the shallow fried brinjals and mix it well.
  21. Add enough water to the level of preferred consistency and curry required.
  22. Bring it to a boil and stop once the oil separates.
  23. Serve hot with steamed rice.


Happy Cooking!!

Enjoy!!

C

Wednesday, September 6, 2017

Chettinadu Kozhi Varutha Curry - Chettinadu Chicken Curry with Roasted Spices

It was during the later part of my 20s when I was introduced to Chettinadu cuisine in restaurants like Anjappar, Karaikudi etc in Chennai. After I moved overseas I had missed it for quite some time until Anjappar started spreading its wings globally. Invariably these restaurants have this dish in their menu - "varutha curry". Recently we had been to a Chettinadu restaurant Grand Chettinad that was newly opened in our area. They had the same dish and it tickled my interest to try it out at home. I had to do a bit of research on this since there were quite a few variations from different chefs. Interestingly there was one North Indian chef who attempted this who pronounced Kozhi as Kozee and of course I ignored the rest of his recipe video. Chettinadu is famous for various chicken curry recipes. I have attempted a few myself - Milagu Kozhi - Pepper Chicken and my very first Chicken Chettinad (after which my nickname of Chicken Chetty came around). The main difference in varutha curry recipe is that you roast all the spices - wet and dry before you add it in the curry. So...long folks - now to the details.

Ingredients

Dry Masala (Spices) - pretty much your entire spice box
  1. Dry Red Chillies (key for any Chettinadu recipe)
  2. Star anise
  3. Cinnamon sticks
  4. Fennel seeds
  5. Cumin seeds
  6. Coriander seeds
  7. Cloves
Wet Masala
  1. Shallots or Red Onions 
  2. Shredded Coconut
  3. Cinnamon sticks
  4. Green cardamom seeds
  5. Poppy seeds
  6. Curry leaves
Marinade
  1. Chicken - chopped in 1-2 inch blocks with and without bones (drumsticks go as is)
  2. Ginger garlic paste
  3. Turmeric powder
  4. Red chilli powder
Other
  1. Tomatoes (pureed)
  2. Curry leaves - for garnish
  3. Mustard seeds
  4. Gingelly Oil
The Method
  1. Marinade the chicken in ginger garlic paste, turmeric powder and chilli powder. Set it aside for about 30 minutes. Pretty much until you complete the other masala steps.
  2. Dry roast the ingredients under "Dry Spices" until you can hear a bit of crackle and smell the aroma of the ingredients. Set this aside to cool down to room temperature.
  3. Grind these ingredients into a smooth powder.
  4. In a pan heat a few tablespoons of gingelly oil and saute the wet ingredients. 
  5. Start with the cinnamon sticks, poppy seeds, green cardamom and curry leaves. 
  6. Add the onions and saute until they turn slightly golden. 
  7. Add the grated coconuts finally and saute until coconut turns slightly brown. (Takes about 5 minutes in all)
  8. Set the wet roasted spices aside to cool down to room temperature.
  9. Blend the wet masala into a coarse to smooth paste.
  10. Heat a large sauce pan and add a few tablespoons of gingelly oil.
  11. Add mustard seeds and saute until they splatter.
  12. Add the marinaded chicken and dry masala and saute until the chicken is half cooked. Usually about 10 minutes.
  13. Add the wet masala and saute for about 5-10 minutes.
  14. Add the tomato puree and salt and saute for about 5 minutes until the puree is blended well.
  15. Add as much water as needed to get the amount of curry and consistency you are after. Remember it is not expected to be too thin.
  16. Leave it to cook until chicken is cooked well and the oil separates.
  17. Garnish with curry leaves and serve hot with rice or parotta.

Enjoy Cooking!!

C

Wednesday, January 4, 2017

Carrot Rice

Happy New Year folks!!  Hope you all had a good start to 2017. Mine surely did with a few tasty experiments at home. The first post for this year is a childhood favourite of mine - Carrot Rice. This is my mom's recipe with a bit of twist here and there. This is one of those rice dishes that doesn't taste too bad when gone cold - having packed it many times for lunch at school. This is a fairly simple and easy to cook as well. Hope you will try this. Do let me know how it turned out.

Ingredients

  1. Grated Carrots - 2 cups
  2. Cumin seeds - 1 tablespoon 
  3. Onions - 2
  4. Green chillies - 4/5
  5. Ginger Garlic paste - 1 table spoon
  6. Cashews - 1/2 cup
  7. Ghee (Clarified Butter) - 2 table spoons
  8. Garam masala - 1 tea spoon
  9. Butter - 150 gms
  10. Basmati rice - 2 cups
  11. Bay leaves - 3 or 4
  12. Turmeric
Method

  1. Pressure cook the basmati rice (1:2 water and 1 whistle) and let it cool.
  2. Heat a wok / kadai and melt the ghee and butter until they liquefy.
  3. Shallow fry the bay leaves, and cashews for a few minutes until the cashews turn golden 
  4. Add the green chillies, cumin, onions, turmeric, garam masala and ginger garlic paste and saute for a few minutes until the onions turn translucent.
  5. Add salt to taste. 
  6. Add the grated carrots and quickly toss it around for about a minute.
  7. Add the basmati rice and mix it thoroughly making sure the rice is all separated and not lumpy.

Carrot Rice Ready!!


Happy Cooking!!

C

p.s.: Please remember to share the post if you like it.

Saturday, September 19, 2015

Masala Pori - Spicy Puffed Rice

Masala Pori - one of those snacks from Tamil Nadu one couldn't have avoided growing up with. Be it the home made variety with all the nuts and spices or the one you would get in a school canteen (or the Marina beach) with just the masala. I still remember buying packs of maybe 10-20 grams each for 25p ($0.005). Haven't had many opportunities to relish this snack once I left Salem (or maybe since middle school?). About 2 years ago Uma got to learn this recipe from her mom when she was in Sydney. As expected this is a huge hit with the kids - young and old. Since then we have been enjoying this every once in a while. It's school holiday time in Sydney and am sure very soon in some parts in India as well. This could turn out to be a simple, quick and handy snack to have at home for the holiday season.


Ingredients


  1. Pori (Puffed Rice)
  2. Mustard seeds
  3. Garlic
  4. Dried Red Chillies
  5. Curry Leaves
  6. Roasted Channa Dal (whole/split)
  7. Peanuts (Raw or Roasted)
  8. Sambar powder
  9. Turmeric
  10. Red Chilli powder
  11. Salt
  12. Vegetable Oil


Method

  1. Heat a few table spoons of vegetable oil in a large kadai / wok.
  2. Saute the mustard seeds until they splatter.
  3. Saute garlic, chillies and curry leaves for a few minutes until the garlic gets fried.
  4. Add the roasted channa and peanuts and saute for a few minutes
  5. Add the spices - salt, chilli powder, sambar powder and mix it up.
  6. Add the puffed rice and mix it thoroughly under heat for a few minutes.
Voila - Masala Pori Ready!!


Happy Cooking

C

Sunday, August 9, 2015

Chicken Biryani - Tamil Nadu Style

Chicken Biryani - a dish that is so "supreme" that it has so many forms and versions - not just within India but across Asia - if not the world. I understand that there are about 15 different Biryani types available in India. Given it's Persian origin, it is also called by many other names in the middle east. One that I have enjoyed myself is a Kabsa. As with all the different varieties not all may be enjoyed by all. I remember during one of my visits in Muscat where a biryani meant a cup of flavoured rice and a deep fried chicken leg on the side. Now that was simple!! I still remember the very first Biryani attempt made about 13 years ago in Portland. Since then there has been many stories around it. One including one of our neighbours coming in to rescue while attempting Hyderabadi Dum Biryani. So here's my first version that is most familiar to me - Tamil Nadu style. Before I go too far - this was prepared by Uma including the photo credits. 

What goes in
  1. Onion
  2. Cardamom
  3. Ginger
  4. Garlic
  5. Cinnamon
  6. Clove
  7. Bay Leaves
  8. Aniseed
  9. Green Chillies
  10. Fennel Seeds
  11. Tomato
  12. Vegetable Oil
  13. Ghee /Butter
  14. Mint
  15. Coriander Leaves
  16. Biryani Masala (optional)
  17. Chicken
  18. Basmati Rice (Washed)
  19. Turmeric Powder

The Method

  1. Blend, onion, garlic, ginger, cinnamon and clove to a paste.
  2. In a pressure pan / cooker melt ghee/butter and oil. When hot, sautee bay leaves, aniseed, green chillies and fennel seeds for few minutes.
  3. Add mint and coriander and sautee for few minutes.
  4. Add the blended mix from step 1 and sautee until oil separates.
  5. Add tomato and sautee for few minutes.
  6. Add chicken with a pinch of turmeric powder, Biryani masala, salt and sautee until chicken is half cooked.
  7. Add basmati rice, mix well and pour water (1.5 cup water : 1 cup of rice).
  8. Pressure cook for 2 whistles.
Chicken Biryani Ready!!


Happy Cooking!!

C

Sunday, July 26, 2015

Chettinad Pepper Chicken Curry - Milagu Kozhi Kozhambu

So I had this sinus bothering me for the last few weeks travelling between winter and tropical weather back and forth almost every week. Decided to get it treated with some pepper chicken. It was a good treatment even while I was cooking. Just the aroma made the difference. Talking about pepper chicken curry, still the best in my opinion is from Parasakthi in Salem. Hopefully someday I will be able cook up something close to that. This was yet another attempt. The best parts of cooking a curry is roasting the masala. As I have mentioned in an earlier post each spice needs to be dry roasted separately to get the best effect. Of course it takes a little bit of time and patience - but worth every bit of it.

What goes in:

Dry Masala (starting from top left in the pic )
  1. Star aniseed
  2. Coriander seeds
  3. Cloves
  4. Fennel
  5. Black Pepper
  6. Poppy seeds (Khus Khus)
  7. Cinnamon sticks
  8. Cumin
"Wet Masala"
  1. Onions
  2. Garlic
  3. Ginger
  4. Tomato
Other Stuff
  1. Chicken
  2. Grated coconut
  3. Gingelly oil
  4. Turmeric
  5. Salt
  6. Black Pepper Powder
  7. Mustard seeds
The Method
1) Blend the ingredients of the wet masala.
2) Roast the dry masala ingredients one by one and let it cool down.
3) Heat a sauce pan and once hot add few table spoons of gingelly oil.
4) Add mustard seeds once the oil is hot.
5) Add the blended wet masala paste, a teaspoon of salt and saute for a few minutes until the oil separates.
6) While the paste is being sauteed powder the dry masala.
7) Once the paste is sauteed enough add the chicken pieces, pinch of turmeric and saute until the chicken is mixed well with the paste.
8) Add the powdered masala, grated coconut, curry leaves and let it to cook for about 15-20 minutes until the chicken is cooked enough. Add required amount of water for the level of consistency needed.
9) Add some black pepper powder if you are not able to get the distinct peppery taste.
10) Garnish with coriander leaves.


Muzhagu Kozhi Kozhambu Ready!! Goes well with steamed rice or parotta.

Happy Cooking!!

C

Sunday, March 22, 2015

Masala Egg Puff

Masala Egg Puff - one of those quintessential bakery snack from Tamil Nadu. The economic snack that filled many a student's hunger pang - oh well we can go on and on about the egg puff. Yet again one of those snacks that you don't easily get outside of Tamil Nadu (may extend to Kerala). After a few attempts of making mixed vegetable and panneer puffs (post about it another time), gave it a shot to try the highschool / uni time favourite snack. Of course it is best accompanied with tomato sauce and masala tea to wash it down.

What goes in:

1) Boiled Eggs (1 egg makes 2 puffs + 1 egg white for brushing later)
2) Frozen Pastry sheets - I wish I could this from scratch as well - maybe another time
3) Onions - Thinly sliced
4) Tomatoes - Thinly sliced
5) Ginger Garlic Paste
6) Turmeric powder
7) Garam masala - Any masala mix would do
8) Oil - to saute


The method:

1) Thaw the frozen pastry sheets for about 10 minutes. Cut it into rectangular pieces before it thaws else it becomes a slightly sticky affair.

2) Saute the onions, tomatoes, turmeric paste and ginger-garlic paste for a few minutes.

3) Add garam masala and salt (to taste) and saute until the tomatoes get mashed up well.You can add some red chilli powder if you want to kick it up a notch.

4) Once done, mix the boiled eggs along with this masala - careful not to break the eggs. Got to toss them in carefully.

5) Place the individual pastry sheets on a tray covered with baking sheet. While you are at this step - preheat the oven at about 220 Deg.

5) Place one egg half - yolk down on each piece of pastry sheet and add the onion/tomato mix on top.

6) Wrap them up as good as you can. This is where it will be some trial and error to cut the right shape and size of the pastry sheet.


7) Brush egg whites on to the top of the pastry sheet.

8) Place the tray in the oven and bake for about 5 minutes. Keep a close watch on the oven as the pastry can get burnt very easily.


Crisp - fluffy - spicy Egg Puffs Ready!!


Happy Cooking!!

C

Sunday, August 26, 2012

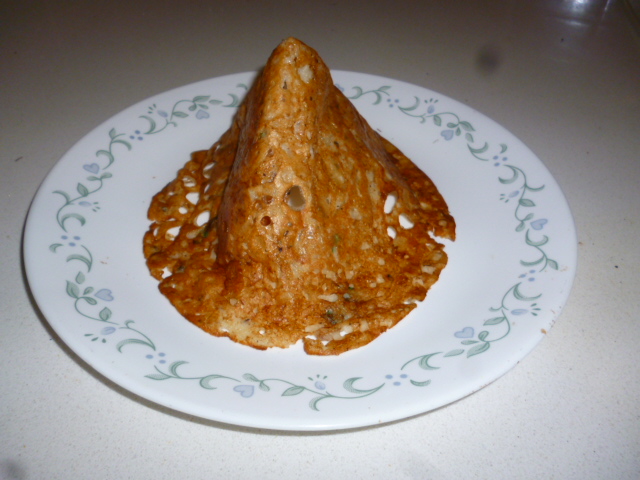
Spicy Semolina Crepe - a.k.a Rava Dosai

Rava Dosai a typical South Indian favourite was not my favourite dish for a long long time. As a kid, I've always tried every other dosa variety BUT Rava dosai. For some reason the thin crispy crepe never caught my attention until very recently. It is one of those restaurant specialities and definitely not a staple dish that one would eat on a daily basis. The reasons became obvious once you start cooking (and eating) them. It is a painstakingly slow process to cook the dosa (not the batter). The outcome of course is definitely well worth the efforts. This recipe is for those living far away from home and not able to get a decent one at your local desi joint.

Ingredients:
Ingredients

1) Rava (Semolina powder)
2) All purpose flour (Maida)
3) Rice flour
4) Yogurt
5) Ginger
6) Green Chillies
7) Coriander leaves (Cilantro)
8) Curry leaves
9) Cumin seeds 
10) Freshly ground black pepper

You can have some chopped / diced onions for an extra kick, but completely optional.

The Process

Batter
1) Prepare the batter by adding all the dry ingredients in an almost equal ratio. You might want to reduce a bit on the Maida (3/4ths measure of Rava) if you are looking for a crispier outcome. The batter looks so watery, but do not get misled by that consistency. Of course, please add some salt to the batter.


2) Heat a skillet / tava / dosai kal and "pour" the watery mixture once the skillet sizzles on liquid contact. The difference here between a regular dosai and rava dosai is you do not spread the batter on the skillet using a spoon (or a cup as the professionals do). You pour the watery liquid and maybe rotate the skillet so the batter goes around evenly and makes an almost round version.

3) If you are using onions, you need to scatter the chopped onions on the skillet first before pouring the batter.

4) Wait PATIENTLY until the surface turns brown and then flip them over.

As mentioned earlier, if you want it crispier, reduce the maida content and of course a generous amount of oil.

Rava dosai - ready  - to be served with chutney (any variety goes).

Happy Cooking!!

C

Thursday, April 7, 2011

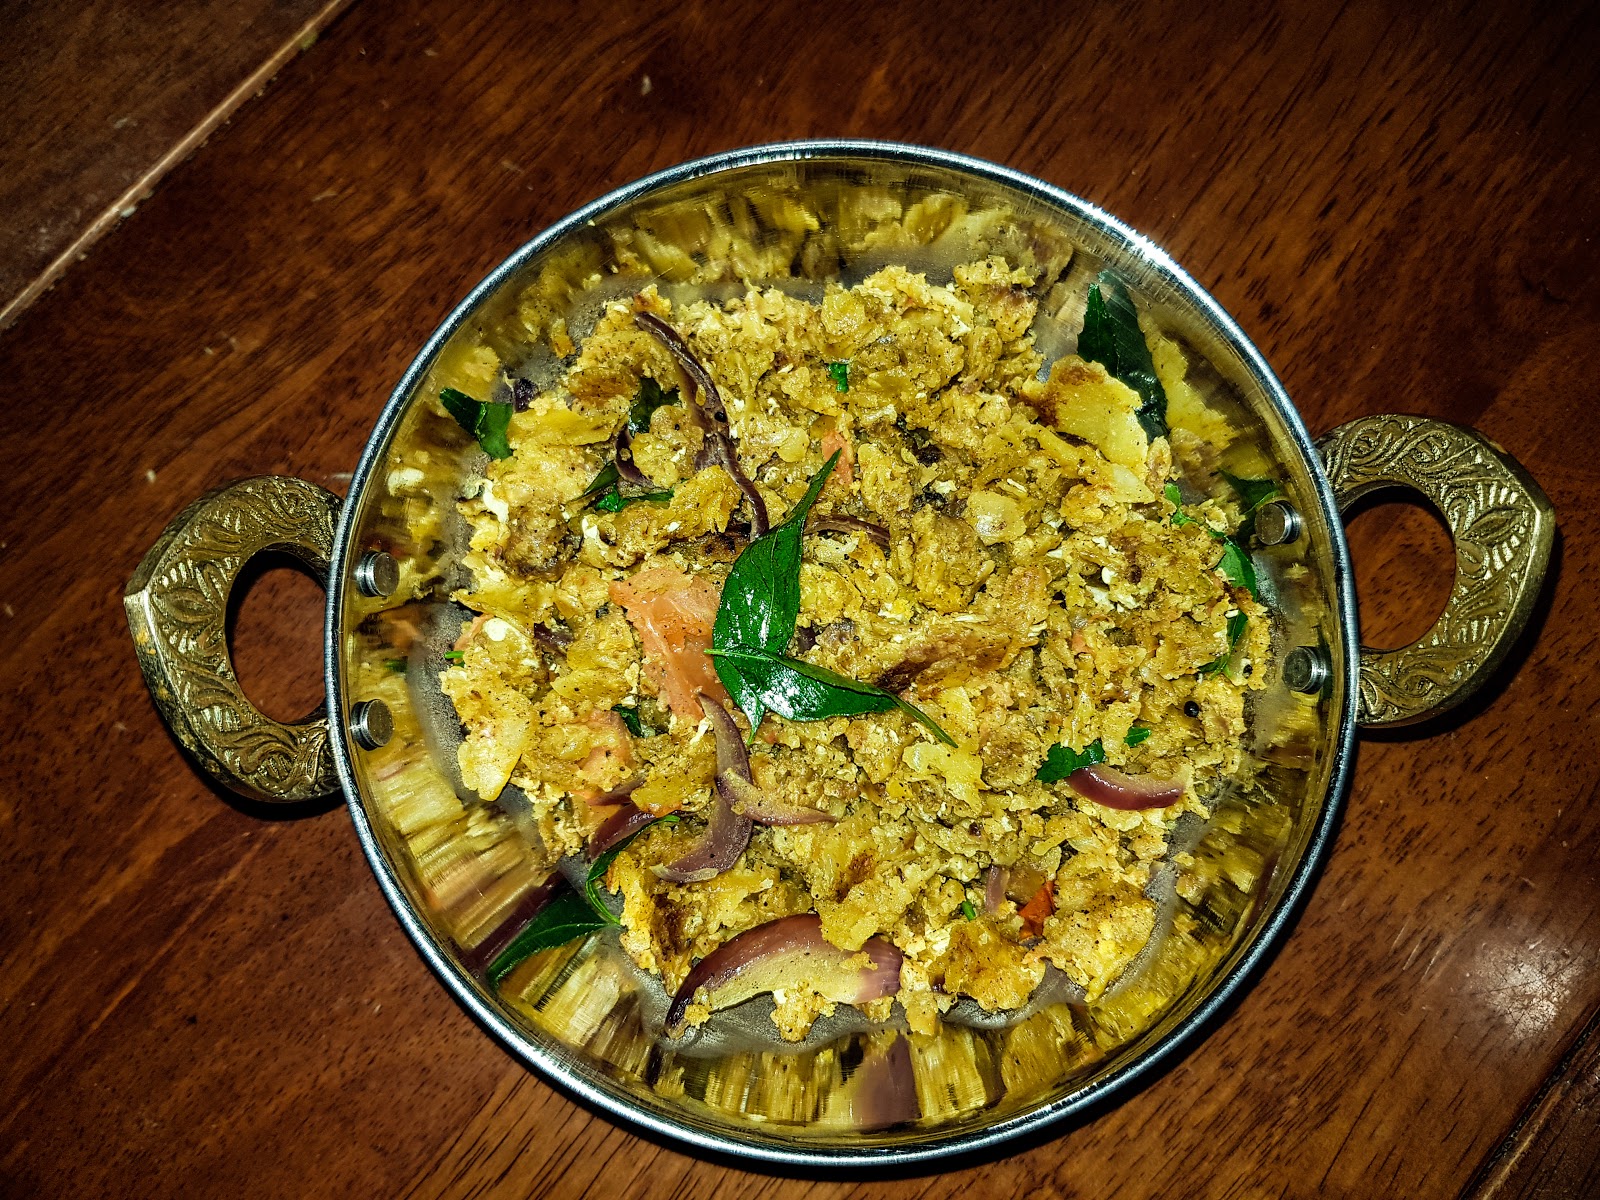
Kothu Parotta


Every country boasts of it's own "street food". Pad thai for Thai, Kway Teaw for Malay, probably a hot dog for the US of A. When it comes to South Indian cusine, my vote would be for Kothu Parotta. Kothu parotta (meaning "chopped" up parotta) is a typical road side delicacy you would find on any road side non-vegetarian stall in Tamil Nadu. If my memory serves right, the first time I had a "professional" kothu was on a roadside shop on the way from Coimbatore to Salem. Don't remember the place, but probably returning from one of my uncle's wedding. My first successful kothu  was done in Portland, OR with the help of THE Mangalam masala. I have to time the preparation of KP right along with making a chicken curry and hence the perfect sequel to Chicken Chettinad. Left over chicken curry gives the extra kick or the professional touch. 

What goes in:

  1. Parotta. This has to be the flaky kerala style or ceylon style parotta available in Indian stores. For those in India...try to get it from the nearby kaiyendhi bhavan (road side shop).
  2. Eggs
  3. Onions
  4. Tomatos
  5. Chicken masala powder
  6. Chicken curry (Should not be too thick. If thick, lighten it up with water.)
  7. Green chillies 
  8. Curry leaves 

The method:
  1. Chop up the parotta into as small pieces as possible. Recently I found a technique with the frozen parottas. I heat it up on a tava and chop (kothu) it up with a knife. I used to do it with hand but found the knife to be doing a better job. (Edit: I used a blender today and "pulsed" the parotta. It gave a texture close to what you get in a restaurant.)
  2. Beat up the eggs separately to make an even spread. (Or just break it open on the parotta later).
  3. Sautee mustard seeds until they splatter.
  4. Sautee the green chillies and onions for a few minutes.
  5. Add the tomatoes to the mix. Need to make sure we dont over cook the tomato. Should maintain the chunky pieces.
  6. Add the chopped up parotta and the masalas (powder and half of the chicken curry).
  7. Add salt as required.
  8. Mix it up well so the masala gets mixed evenly.
  9. Create a space in the middle of the kadai by pushing the parotta mix to the side. (Alternatively just break open the eggs on the parotta or pour the beaten egg over the parotta).
  10. Pour the beaten egg and scramble it until its 3/4ths cooked.
  11. Mix up the parotta along with the scrambled egg so that a light coating of the egg is applied on to the parotta as well.
  12. Empty the remaining chicken curry into the mix.
  13. Add curry leaves and coriander as garnish and give it a final toss.
The result:

Enjoy

C