Showing posts with label Continental. Show all posts

Saturday, April 25, 2020

Stuffed Mushrooms

Stuffed Mushrooms - Something that the American restaurants blessed me with on many occasions.  Stuffed mushrooms along with corn meal biscuits are an amazing combination. A good part is we can experiment with it in so many different ways for the stuffing. Few years ago I tried masala stuffed mushrooms.  This time it's a bit more traditional but with my own twists. It's a great option for an appetizer / entree and goes very well with a glass of red. :) 


Ingredients (these measurements for about 15-20 mushrooms)

  1. Mushrooms – preferably the wide ones that you can stuff after removing the stem
  2. Garlic – minced (about 3-4 cloves)
  3. Onions – finely chopped (1/2)
  4. Cream Cheese (100 gms)
  5. Parmesan Cheese – grated (1/2 cup)
  6. Mozzarella Cheese - grated (1/2 cup)
  7. Sundried tomato - minced (optional) 3-4 tablespoons
  8. Italian herbs - 1 tablespoon
  9. Butter - 30 gms
  10. Coriander leaves – finely chopped - 2 table spoons
  11. Bread crumbs - 3-4 table spoons
  12. Black Pepper powder - 1 table spoon
  13. Olive oil spray

Method


  1. Remove the stem of the mushrooms and chop them finely. This is of course going to be the core of your stuffing.
  2. Heat a sauce pan and melt a few tablespoons of butter.
  3. Saute the onions, garlic, mushroom stems and sun dried tomatoes for a few minutes with Italian herbs, black pepper powder and salt to taste.
  4. Keep the mixture aside and bring it close to room temperature.
  5. Using a fork, mix the cream cheese, bread crumbs, parmesan.
  6. Add the cooled down mushroom mix into the cream cheese and mix well.
  7. Use a teaspoon of this mixture and stuff the de-stemmed mushroom cups.
  8. Garnish the stuffed mushrooms with a sprinkle of parmesan and mozzarella cheese.
  9. Place the mushrooms on a baking tray lined with aluminium paper.
  10. Spray them around with olive oil. This is optional.
  11. Bake the mushrooms in an oven at 175 degrees Celsius for about 5-7 minutes – just until the parmesan starts turning golden (or you start smelling a burnt smell – whichever comes earlier).
  12. Allow the mushrooms to cool for a few minutes before serving.
  13. Garnish with a sprinkle of chopped coriander leaves.
Enjoy!!

C

Wednesday, October 10, 2018

Bread Pudding with Caramel Sauce


Can't believe it's been more than a month since my previous post. Time does zoom by (an easy excuse eh!!).  Bread pudding - something I've had very rarely as a child but the taste just stuck to me somewhere deep in the middle of irrelevant memories. I've had some opportunities to eat it again during my trips to Manila. As they say everything has it's own time - and it took a while for me to create one at home. It's such a fairly simple recipe that doesn't involve too many ingredients or complex steps. Caramel sauce - something that I've had as topping for ice creams - but a good topping for a pudding. This again is very simple and quick to do.

Ingredients

Pudding
  1. Any type of thick bread diced up - preferably not the sliced ones - 250 gms
  2. Eggs - 12  (you will need 6 whole eggs and 6 egg yolks)
  3. Warm Milk - 1 cup
  4. Vanilla essence - 2 tea spoons
  5. Sugar - 1 cup
  6. Sultanas/Raisins - 1/2 cup
  7. Dried Cranberries - 1/2 cup (optional)
  8. Slivered almonds - 1 cup
  9. Butter for lining the tray


Caramel Sauce
  1. Brown sugar - 1 cup
  2. Butter - 150 gms
  3. Cream - 250 ml
  4. Vanilla essence - 1 tea spoon
The Method
  1. Preheat the oven to 160 deg Celsius.
  2. Dice up the bread in large cubes (about 2 inches).
  3. Take a large baking tray either metal or glass (I used glass) and line the inner surface with a stick of butter.
  4. Beat the eggs and sugar to a smooth paste (custard).
  5. Add the warm milk slowly while continue whisking the custard to ensure the eggs dont cook and curdle.
  6. Place the bread pieces in the tray nicely packed until the whole area is covered.
  7. Sprinkle half of the sultanas / raisins, cranberries and the almonds roughly across the bread and pour half of the custard until the bread pieces are soaked.
  8. Place the remaining bread, sprinkle the sultanas, cranberries and almonds and pour the remaining custard on top.
  9. Squish the bread down and ensure all of the bread is well soaked in the custard. (If you felt the custard was not enough - you could cheat a bit with adding a bit more milk).
  10. Place it in the oven in a water bath and let it bake for about 40 minutes (Have an eye on it after 20-30 minutes to ensure they don't burn out.)
  11. While the pudding is being baked you can now start with the caramel sauce. Take a deep sauce pan and mix the sugar, butter and cream  on medium heat and continue whisking to create a smooth consistency.
  12. Continue cooking the sauce and stirring occasionally for about 7-8 minutes until it thickens to your desired consistency. 
  13. The pudding is ready when you can test it by inserting a knife or a tooth pick and it comes out dry.
  14. Scoop it up and serve with a warm drizzle of the caramel sauce.
Note: The caramel sauce can be stored in the fridge for a week or 2. You will need to warm it up every time since it thickens up easily.


Enjoy!!

Happy Cooking !!

C

Saturday, July 21, 2018

Banana Nut Muffins

Muffins - they come in different flavours. I've always wondered if that was a dessert or a main course for breakfast or just a side snack for a coffee. Whatever it may be - it's just delicious to devour. I still remember the mega size muffins sold in big trays in Costco. Maybe that's a breakfast sized muffin? So here it is the first and my most favourite version - Banana Nut. It's got the flavours of banana, softness of the muffin and a nice surprise crunch from the walnut (or pecan if you chose to). So without much further ado...

Ingredients

  1. Ripe Bananas - 3
  2. Vegetable oil - 125 ml
  3. Eggs - 2
  4. Plain flour - 250 gms
  5. Caster sugar - 100 gms
  6. Baking Soda - ½ teaspoon
  7. Baking powder - 1 teaspoon
  8. Walnuts - 200 gms (you can substitute this with pecans if you like)
Baking Utensils
  1. Medium sized muffin tray
  2. Muffin paper cups
  3. Ice cream scoop 
The above measures creates about 10 - 12 medium sized muffins.

The Method

  1. Pre-heat the oven (not fan forced) to 180 deg C.
  2. Mash the bananas to a nice pulp and keep it aside.
  3. In a large bowl whisk the oil and eggs together until they are blended well.
  4. Mix the mashed bananas and mix it well.
  5. Add the dry ingredients (#4 to  #7) and mix it well to a smooth batter.
  6. Add about 90% of walnuts and fold it in to the batter until they are spread evenly.
  7. Line the muffin cups in the muffin tray.
  8. Using an ice cream scoop and a spoon pour the batter into the muffin cups until each cup is about 2/3rds to 3/4ths full. (Note: the cups should not be filled completely as the batter raises up).
  9. Bake for 20 minutes or until the top gets to a medium brownish colour. If in doubt use a toothpick to test the batter. It should come out clean when inserted.
  10. Set the muffins to cool on a cooling rack for about 20 minutes.
Happy Cooking

C


Monday, April 30, 2018

Belgian Buttermilk Waffles


Waffles - yet another dish introduce to me during my stay in USA, always a big breakfast treat during some of the visits to International House of Pancakes (IHOP). A dish which I wonder if it is meant to be a breakfast meal as in the USA or a dessert as it is served down under. I guess it really doesn't matter as long as it is nice and crispy on the outside and fluffy on the inside. Some of my vegan friends are asking for egg substitute. I read somewhere that you can use apple sauce. However not sure how that can create the fluffiness. Unfortunately this is one of those dishes that you do need a special device - the waffle maker - and a good one at that. Last year we bought one from Target and it simply didn't work out. Recently we got a good one from Cuisinart and it made all the difference. So if you are keen on waffles do make this investment and you will not be disappointed. You can realize the return in under 10 visits to a waffle shop. Waffles as any other dish comes in various shapes and forms. This is the so called "Belgian Buttermilk" version which is brown and crispy on the outside, soft and fluffy on the inside. 

Ingredients


  1. All purpose flour (Maida) - 1 and 3/4 cups
  2. Corn Starch - 1/4 cup
  3. Eggs - 3 (At room temperature with yolks and white separated)
  4. Butter - 125 gms (melted and cooled down to room temperature)
  5. Buttermilk - 2 cups
  6. Vanilla essence - 2 teaspoons
  7. Salt - 1 teaspoon
  8. Sugar - 2 teaspoons
  9. Baking powder - 2 teaspoons

The Method

  1. Firstly get the eggs to room temperature. If you are running short of time soak the eggs in warm water for a few minutes.
  2. Separate the egg yolk and whites in separate dishes. Make sure you leave the whites in a deep bowl.
  3. Whip the white slowly initially and on high speed for a few minutes. Add the sugar and continue whipping until stiff "peaks" are formed.
  4. Mix the liquid ingredients - butter, buttermilk, egg yolk, vanilla essence and blend well until all mixed up.
  5. Sift the dry ingredients - flour, corn starch, salt, baking powder and baking soda. Blend it well but not too hard.
  6. Add the egg white and mix it in slowly until everything is blended well. 
  7. Heat the waffle maker until it is ready and pour the batter.
  8. For the machine that I used I cup of batter is exactly what was required.
  9. Waffle should be ready in about 3-5 minutes.

'

Happy Cooking !!

C

Tuesday, February 14, 2017

Double Chocolate Fudge Cheese Cake

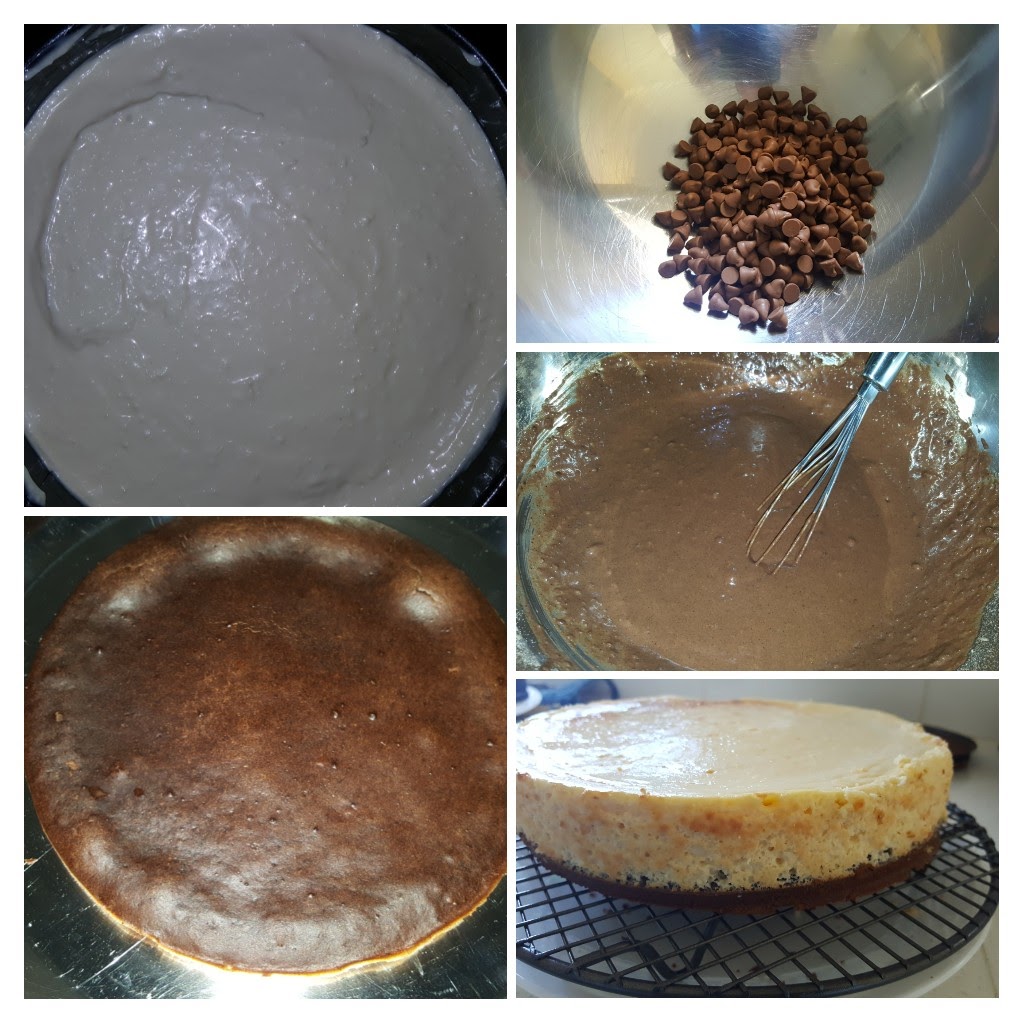
So it's Valentines Day - what else could be more befitting than something to do with chocolate. They say chocolate is a great aphrodisiac- why not double the impact with a Double Chocolate Fudge Cheesecake!! This recipe has of course has lots of cocoa in many forms. Here's to all the Valentines across the world. This cheese cake was baked with help of my little helper Naga. This preparation has got 3 parts, the fudge cake base, cheesecake and the "ganache". I've always heard of this ganache and thought it was something very technical in baking terms - only to realise that it was nothing but icing made out of heavy cream. It is a long process as in there is a lot of wait time involved - but a fairly simple process. So without much further ado....


Ingredients

Chocoloate Fudge Cake Base

  1. ½ cup cocoa powder
  2. 1 tsp baking powder
  3. 1¾ cups  plain flour
  4. 1¾ cup sugar - I used brown sugar
  5. 250g / 2 sticks unsalted butter (melted)
  6. 1¼ cups milk 
  7. ¼ cup oil  (vegetable, canola)
  8. 2 eggs
Cheesecake
  1. 2 blocks of cream cheese (250 gms each)
  2. 3 eggs
  3. 3 teaspoons of vanilla extract
Ganache
  1. 250 ml of heavy cream
  2. 125 gms milk chocolate chips
  3. 125 gms dark chocolate chips


The Method

The Base
  1. Sift and mix all the dry ingredients for the fudge cake (#1 - 3) into a large mixing bowl.
  2. Add all the wet ingredients along with sugar and mix it well until it turns into a nice smooth batter.
  3. Grease the bottom and inner sides of a spring pan baking tray with oil.
  4. Pour the batter and bake in a 165 degree fan forced oven for about 15 - 20 minutes. 
  5. Make sure there is enough space for the cheesecake batter to be poured.
  6. Stop baking as soon as you smell the cake. Do the toothpick test to ensure it comes out clean.
  7. Set the baked base aside for about 20-30 minutes and allow it to cool.
Cheesecake
  1. Mix the blocks of cream cheese (already under room temperature) until it gets all mushed up.
  2. Mix the eggs and vanilla extract and make a smooth batter. Use an electrical whisk if needed.
  3. Pour the cheesecake batter on top of the fudge cake base.
  4. Bake the cheese cake for about 15 - 20 minutes until the top layer gets a bit of a brownish tint.
  5. Take the pan out and ensure the batter passes the "jiggle test" - there should be some minimal movement of the cheese cake.
  6. Cool the baked cake for about 30 minutes and place it in a fridge for about 4 hours. I refrigerated it overnight.
Ganache
  1. Heat the cream on low-medium heat and bring it to boil.
  2. Pour the boiling cream into a large bowl containing the chocolate chips.
  3. Mix it well until the chocolate melts.
  4. Filter this mix to avoid any lumps to get a nice velvetty mix.
  5. Let it cool down to room temperature - for about an hour or so.

The Finale
  1. Place the baked cake on a cooling tray (placed on a plate).
  2. Pour the ganache mix from the center of the cake slowly in a circling fashion until the entire cake and its sides get coated with the ganache.
  3. Refrigerate the cake for about an hour or so before serving.
  4. You can garnish with your favourite berry - either a strawberry or a raspberry.

Voila


Happy Baking!!
C

Saturday, December 17, 2016

Le Gateaux Carotte a.k.a Carrot Cake


I have always wondered how/why  spices like Cinnamon and Nutmeg can get into a baker's pantry. Carrot cake is one brilliant example how these spices can add so much flavour to a cake. Carrot Cake is one of those desserts which has various textures baked in - soft, moist and crunchy. Whenever I try a store bought cake the icing always puts me off - there's always so much icing and a bit too sweet. Here's my version of a soft, moist and crunchy carrot cake.


Ingredients

For Batter

  1. All purpose flour - 2 cups
  2. Baking powder - 3 teaspoons
  3. Cinnamon powder - 2 teaspoons
  4. Nutmeg powder - 2 teaspoons
  5. Brown Sugar - 1 cup
  6. Melted Butter - 125 gms (1/2 cup)
  7. Cream - 2 tablespoons
  8. Milk - 3-4 tablespoons
  9. Vegetable oil - 1/2 cup
  10. Vanilla essence - 2 teaspoons
  11. Eggs - 3
  12. Grated Carrot - 1 1/2 cups
  13. Crushed walnuts
For Icing
  1. Cream cheese - 1 block
  2. Butter - 125 gms
  3. Vanilla essence - 2 teaspoons
  4. Icing sugar - 2 cups

The Method

The Cake
  1. Sift through all the dry ingredients (#1 - #5) in a large mixing bowl,
  2. Whisk all the wet ingredients (#6 - #10) in another bowl. 
  3. Blend the dry and wet ingredients along with the grated carrot and crushed walnuts until they are mixed evenly.
  4. Grease a baking pan with butter or vegetable oil and pour the batter in.
  5. Spread the batter around the pan so they are evenly filled.
  6. Bake the batter in a 150 deg C oven - slightly higher temperature if not fan operated for a out 20 minutes
  7. As always - follow your nose for baking until you get the aroma of something baking.
  8. Test the cake by inserting a tooth pick in the middle and it should come out clean without any batter sticking on to it.
  9. Remove the cake and let it cool while you work on the icing.

The Icing
  1. Take the cream cheese and butter that is already is already in room temperature (keep them outside before you start the entire procedure) and whisk them on a high speed whisk /  blender until you get a smooth pasty texture.
  2. Sift through the icing sugar along with the vanilla essence and blend it well.
  3. If you would like to decorate your cake with some "carrots" you could take a few tablespoons of this icing separately and mix food colours as you need. (Green for the "leaves" , Red and yellow for the "carrot").
The finishing touches
  1. By now you have what you need for a carrot cake. Apply the icing on top and all over the cake once the cake has cooled down (about 30 minutes post baking).
  2. If you like a layered cake - slice the cake in the middle, apply a layer of icing on the bottom layer and then smother all the rest of icing all around.
  3. You can bag the coloured icing in a ziploc bag and attempt your artistic talents to create the carrots on top of the icing. Being my first time I had mixed success. There are enough Youtube  videos on how to decorate your carrot cake.

Sunday, November 27, 2016

Masala Stuffed Mushrooms

Thanks Giving weekend always reminds me of all the yummy food and the potluck events in the US of A. One of my favourites from America is the stuffed mushroom. Can’t recollect a specific restaurant where I picked my fancy for this amazing appetizer – maybe Red Lobster? I have enjoyed this in many places but totally missed it after relocating to down under. Yesterday I got reminded of these through a video from Tasty on Facebook. Couldn’t wait to recreate it with of course a bit of my own twist – Masala Stuffed Mushrooms.

Ingredients:
1)      Mushrooms – preferably the wide ones that you can stuff after removing the stem
2)      Garlic – minced
3)      Onions – finely chopped
4)      Cream Cheese
5)      Parmesan Cheese – grated
6)      Butter
7)      Parsley – finely chopped
8)      Bread crumbs
9)      Garam masala
10)   Turmeric powder
11)   Black Pepper powder

The Method
1)      Remove the stem of the mushrooms and chop them finely. This is of course going to be the core of your stuffing.
2)      Heat a sauce pan and melt a few tablespoons of butter.
3)      Saute the onions, garlic and mushroom stems for a few minutes with garam masala, turmeric powder, black pepper powder and salt to taste.
4)      Keep the mixture aside and bring it close to room temperature.
5)      Using a fork, mix the cream cheese, bread crumbs, parmesan.
6)      Add the cooled down masala mushroom mix into the cream cheese well enough for the masala to be mixed evenly.
7)      Use a teaspoon of this mixture and stuff the de-stemmed mushroom cups.
8)      Garnish the stuffed mushrooms with a sprinkle of parmesan cheese.
9)      Place the mushrooms on a baking tray lined with aluminium paper.
10)   Bake the mushrooms in an oven at 175 degrees Celsius for about 5 minutes – just until the parmesan starts turning golden (or you start smelling a burnt smell – whichever comes earlier).
11)   Allow the mushrooms to cool for a few minutes before serving.
12)   Garnish with a sprinkle of chopped parsley.

Hope you had a good Thanks Giving Weekend!!
Enjoy Cooking!!

Tuesday, May 10, 2011

Cream of Mushroom Soup

Hello,

Cream of Mushroom soup - was introduced via the spice trade from Malaysia to India. ;-) My grand pa brought these soup packets whenever he visited from Labuan - late 70s early 80s??. Definitely don't remember the brand  but still remember the smell. After that it has been a long long time since I've had a good cream of mushroom soup until I started cooking that myself. This is one soup that you don't normally get in restaurants and if you do - not worth mentioning.

Recently tried this when we had a bunch of friends over for dinner and came out fairly ok.

Ingredients
1) Mushroom - any variety would do I suppose.
2) Butter
3) Cream
4) Milk
5) Corn flour
6) All purpose flour (Maida)
7) Onions
8) Celery sticks (minced). Chopping celery is a very interesting activity. It gives a great smell and feel as you chop it.
9) Vegetable stock (can try chicken stock as well to enhance the flavour)

Process
1) Finely chop the mushrooms and onions. I recently found a trick to mince the mushrooms in a hand blender.    Definitely very handy when you have to do this on a large scale.
2) In a large sauce pan, melt the butter in low/medium heat.
3) Once butter is melted add the the mushrooms, onions and celery and sautee them for about 3-4 minutes.
4) Add the vegetable stock and bring it to a boil.
5) Add a 1-2 tablespoons of cream and about half a cup of milk.
6) Once the above gets to a boil add a mix of corn flour and all purpose flour in water.
7) Leave the soup to boil and then simmer for a few minutes until it thickens to a consistency you need.

Happy Cooking!!

C

Saturday, March 26, 2011

Pan Cake - Apple Cinnamon

I can't say I grew up on pan cakes, but I do remember the very first pan cakes I've had in my grandparent's house in  Muniappan Koil St, Salem made by my aunt. As a child there were probably very few occasions that I enjoyed pan cakes. However things changed after I went to US of A thanks to IHOP (International House Of Pancakes).

While in the US, we had a "tradition" of having a pan cake breakfast on Sundays for a very long time. "Aunt Jemima" came to our rescue then. They had the best pan cake mixes we've ever had. After our return from US we again had a break in pan cakes for quite some time. The best pan cakes I've had recently was at my cousin's house in Brisbane. Bro - those were awesome blueberry pancakes!!

In the Oz, we haven't been lucky enough to find a good pan cake mix. All we find at the local groceries are the ready made mixes where you just mix water to prepare the batter. Not very happy with that. It's all good...it pushed us to prepare our own batter from the scratch. In Sydney we've had some good pan cakes at a place called City Extra. A concept which the owners picked up from a trip to the US of A.

The recipe here is a bit of a mix from several sources with a bit of our own twist.

What goes in


Guess I have to give the specific measurements this time. Anything to do with flour and egg together, if you mess it up the proportions - well it becomes a mess. :-)


1) All purpose flour - 1 and 1/2 cups
2) Baking powder - 1 tea spoon
3) 1 Egg (Yolk and White separated)
4) 1 and 1/3rd cup milk
5) 1 Apple
6) 1 tea spoon cinnamon powder
7) 1 tablespoon sugar
8) 2 tablespoons butter (melted)
9) Maple Syrup (NOT Maple flavoured syrup - has to be natural maple syrup)

What went in...


The Process

1) Peel the skin off the apple and grate the pulp.
2) Mix the flour, baking powder, milk, egg yolk, melted butter, cinnamon powder and beat it to a nice smooth batter. Try not to have the lumps.
3) Add the grated apple and give the mix a good beat.
4) Beat the egg whites fast enough to make the creamy white stuff out of it. Easier if you have mechanical beater.
5) Mix the egg white into the batter in the end.

6) Heat a tawa - skillet or whatever flat surface you choose. The temperature of the tawa plays an extremely critical role in the outcome of the pancake. It has to be just right!! I do it on low flame. It takes a little longer. But hey...we have to wait for good things in life. :-) (Hope any of my team members 7reading this don't take a different cue from this. ;-))

7) Pour about half a cup of flour (about one serving of the spoon  in the pic above).

8) Wait for the bubbles to come up and the sides to harden up a bit. Approximately 2 minutes.

9) Flip it over and wait for another minute or so and....voila...

It's better served with a scoop of butter and of course with Maple Syrup

The Result...

(please bear with my presentation skills...still working on them...rather too hungry to eat rather to perfect the presentation) ;-)

Made a slight variation for Nandhitha:
Funny Face Pan Cake


She wanted a "Funny Face" pan cake as she had one in City Extra. :-)