Showing posts with label Breakfast. Show all posts

Saturday, May 2, 2020

Japanese Souffle Pancakes

Pancakes has been a weekend affair at home for a while. Every now and then the "Tasty" channels throws in a feed of these super fluffy souffle pancakes tempting me to try. Well it didn't take too long for me to fall for it. After a look up on a few YouTube videos finally landed on one which I though would work for me and of course customised it a bit for my needs. It only took 3 attempts for me to get here. So here's a "Chetty proof" version which I would love to get some feedback. As one of my friends suggested I tried to include more photos of the process as "behind the scenes". Hope they help.


Ingredients
(these measurements makes about 8 pancakes - good for a family of 4)


  1. Plain flour - 1 cup
  2. Baking soda - 1 tea spoon
  3. Milk - 3-4 tablespoons
  4. Vanilla extract - 1 tea spoon
  5. Eggs - 6
  6. Sugar - 1 teaspoon
  7. Cream of Tartar - 1/2 teaspoon
  8. Salt - 1/4 tea spoon

Method
  1. Separate the egg whites and yolks in different large bowls.
  2. Step 2
  3. Add sugar and cream of tartar powder in the egg whites and beat until stiff peaks are formed.
  4. Mix the egg yolks with flour, milk, salt and vanilla essence until all of them are mixed well into a smooth paste.
  5. Fold in the egg white meringue into the batter slowly until a smooth foamy batter is formed.
  6. Create a ring using baking paper. The ring should be 2 cms tall and about 8-9 cms in diameter. This dimension is very important folks. Any other size will mess things up.
  7. Heat a non stick tawa on low heat.  The lowest possible on your stove. 
  8. Sprinkle a few drops of water. The tawa is ready when the water sizzles.
  9. Place the baking paper ring and pour about 3/4th of a cup of the batter into the ring. Remember this will raise up a bit so do not pour until the brim.
  10. Step 3
  11. Add a few table spoons of water around the side and steam it for 1 minute with a lid on. The timing is very important. This may slightly vary based on your setup.
  12. Flip it around and steam it again with water on the side for another minute.
  13. Remove the pancake into a plate and remove the paper ring.
  14. Serve hot with butter and maple syrup.

Enjoy!!
C

Some behind the scene images


Step 4
Step 10
Step 8
Step 9 

Friday, April 10, 2020

Masala Mushroom Cheese Omelette

Whenever I have an omelette I go down the road of nostalgia where so many things that come to my mind. Back in those days omelettes had to be cooked in separate vessels and not in the kitchen. I still remember a Bud Spencer movie where he eats a 12 egg omlette. The most I've gone up to has been 3. 😀 The "bread (masala) omelette" in Kovai Express was always something we looked forward to in our trips to Madras. Fast forward few decades later cheese omelettes came into play thanks to Denny's and IHOPs. So here's a mix of few of those memories - Masala Mushroom Cheese Omelette.

Ingredients

  1. Eggs - 2 (or 1 or 3 or 12 if you like) :)
  2. Onions - 1 table spoon (finely minced)
  3. Green chilli - 1 (minced)
  4. Mushroom  - 2 tablespoon (minced)
  5. Grated cheese - 2 table spoons I used a 3 cheese mix (Mozzarella, Parmesan & Cheddar)
  6. Turmeric powder - 1 pinch
  7. Cumin powder - 1 pinch
  8. Salt - 1 pinch
  9. Black pepper powder - 1/2 tea spoon

Method
  1. Heat a wide sauce pan and grease it with a few drops of any vegetable oil.
  2. Saute the onions, chillies and mushroom along with salt, turmeric powder and cumin powder.
  3. Beat the eggs well with a pinch of salt until the yolks and white are blended well.
  4. Add the sauteed onions, chillies and mushrooms to the egg and mix well.
  5. Grease the sauce pan (while keeping the stove to low flame / heat)
  6. Add the egg mixture and circle around the pan to have an even spread.
  7. Add the grated cheese and cook with a covered lid for about a minute until the cheese melts.
  8. Roll the omelette up and serve with toast (and tomato ketchup).
Enjoy!!

C


Monday, April 30, 2018

Belgian Buttermilk Waffles


Waffles - yet another dish introduce to me during my stay in USA, always a big breakfast treat during some of the visits to International House of Pancakes (IHOP). A dish which I wonder if it is meant to be a breakfast meal as in the USA or a dessert as it is served down under. I guess it really doesn't matter as long as it is nice and crispy on the outside and fluffy on the inside. Some of my vegan friends are asking for egg substitute. I read somewhere that you can use apple sauce. However not sure how that can create the fluffiness. Unfortunately this is one of those dishes that you do need a special device - the waffle maker - and a good one at that. Last year we bought one from Target and it simply didn't work out. Recently we got a good one from Cuisinart and it made all the difference. So if you are keen on waffles do make this investment and you will not be disappointed. You can realize the return in under 10 visits to a waffle shop. Waffles as any other dish comes in various shapes and forms. This is the so called "Belgian Buttermilk" version which is brown and crispy on the outside, soft and fluffy on the inside. 

Ingredients


  1. All purpose flour (Maida) - 1 and 3/4 cups
  2. Corn Starch - 1/4 cup
  3. Eggs - 3 (At room temperature with yolks and white separated)
  4. Butter - 125 gms (melted and cooled down to room temperature)
  5. Buttermilk - 2 cups
  6. Vanilla essence - 2 teaspoons
  7. Salt - 1 teaspoon
  8. Sugar - 2 teaspoons
  9. Baking powder - 2 teaspoons

The Method

  1. Firstly get the eggs to room temperature. If you are running short of time soak the eggs in warm water for a few minutes.
  2. Separate the egg yolk and whites in separate dishes. Make sure you leave the whites in a deep bowl.
  3. Whip the white slowly initially and on high speed for a few minutes. Add the sugar and continue whipping until stiff "peaks" are formed.
  4. Mix the liquid ingredients - butter, buttermilk, egg yolk, vanilla essence and blend well until all mixed up.
  5. Sift the dry ingredients - flour, corn starch, salt, baking powder and baking soda. Blend it well but not too hard.
  6. Add the egg white and mix it in slowly until everything is blended well. 
  7. Heat the waffle maker until it is ready and pour the batter.
  8. For the machine that I used I cup of batter is exactly what was required.
  9. Waffle should be ready in about 3-5 minutes.

'

Happy Cooking !!

C

Sunday, August 26, 2012

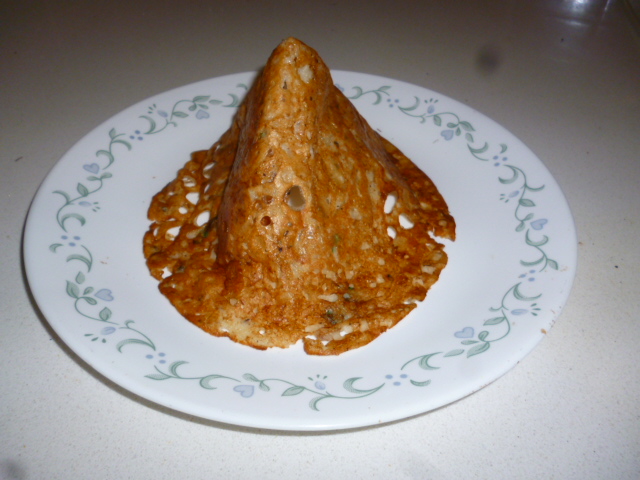
Spicy Semolina Crepe - a.k.a Rava Dosai

Rava Dosai a typical South Indian favourite was not my favourite dish for a long long time. As a kid, I've always tried every other dosa variety BUT Rava dosai. For some reason the thin crispy crepe never caught my attention until very recently. It is one of those restaurant specialities and definitely not a staple dish that one would eat on a daily basis. The reasons became obvious once you start cooking (and eating) them. It is a painstakingly slow process to cook the dosa (not the batter). The outcome of course is definitely well worth the efforts. This recipe is for those living far away from home and not able to get a decent one at your local desi joint.

Ingredients:
Ingredients

1) Rava (Semolina powder)
2) All purpose flour (Maida)
3) Rice flour
4) Yogurt
5) Ginger
6) Green Chillies
7) Coriander leaves (Cilantro)
8) Curry leaves
9) Cumin seeds 
10) Freshly ground black pepper

You can have some chopped / diced onions for an extra kick, but completely optional.

The Process

Batter
1) Prepare the batter by adding all the dry ingredients in an almost equal ratio. You might want to reduce a bit on the Maida (3/4ths measure of Rava) if you are looking for a crispier outcome. The batter looks so watery, but do not get misled by that consistency. Of course, please add some salt to the batter.


2) Heat a skillet / tava / dosai kal and "pour" the watery mixture once the skillet sizzles on liquid contact. The difference here between a regular dosai and rava dosai is you do not spread the batter on the skillet using a spoon (or a cup as the professionals do). You pour the watery liquid and maybe rotate the skillet so the batter goes around evenly and makes an almost round version.

3) If you are using onions, you need to scatter the chopped onions on the skillet first before pouring the batter.

4) Wait PATIENTLY until the surface turns brown and then flip them over.

As mentioned earlier, if you want it crispier, reduce the maida content and of course a generous amount of oil.

Rava dosai - ready  - to be served with chutney (any variety goes).

Happy Cooking!!

C

Saturday, March 26, 2011

Pan Cake - Apple Cinnamon

I can't say I grew up on pan cakes, but I do remember the very first pan cakes I've had in my grandparent's house in  Muniappan Koil St, Salem made by my aunt. As a child there were probably very few occasions that I enjoyed pan cakes. However things changed after I went to US of A thanks to IHOP (International House Of Pancakes).

While in the US, we had a "tradition" of having a pan cake breakfast on Sundays for a very long time. "Aunt Jemima" came to our rescue then. They had the best pan cake mixes we've ever had. After our return from US we again had a break in pan cakes for quite some time. The best pan cakes I've had recently was at my cousin's house in Brisbane. Bro - those were awesome blueberry pancakes!!

In the Oz, we haven't been lucky enough to find a good pan cake mix. All we find at the local groceries are the ready made mixes where you just mix water to prepare the batter. Not very happy with that. It's all good...it pushed us to prepare our own batter from the scratch. In Sydney we've had some good pan cakes at a place called City Extra. A concept which the owners picked up from a trip to the US of A.

The recipe here is a bit of a mix from several sources with a bit of our own twist.

What goes in


Guess I have to give the specific measurements this time. Anything to do with flour and egg together, if you mess it up the proportions - well it becomes a mess. :-)


1) All purpose flour - 1 and 1/2 cups
2) Baking powder - 1 tea spoon
3) 1 Egg (Yolk and White separated)
4) 1 and 1/3rd cup milk
5) 1 Apple
6) 1 tea spoon cinnamon powder
7) 1 tablespoon sugar
8) 2 tablespoons butter (melted)
9) Maple Syrup (NOT Maple flavoured syrup - has to be natural maple syrup)

What went in...


The Process

1) Peel the skin off the apple and grate the pulp.
2) Mix the flour, baking powder, milk, egg yolk, melted butter, cinnamon powder and beat it to a nice smooth batter. Try not to have the lumps.
3) Add the grated apple and give the mix a good beat.
4) Beat the egg whites fast enough to make the creamy white stuff out of it. Easier if you have mechanical beater.
5) Mix the egg white into the batter in the end.

6) Heat a tawa - skillet or whatever flat surface you choose. The temperature of the tawa plays an extremely critical role in the outcome of the pancake. It has to be just right!! I do it on low flame. It takes a little longer. But hey...we have to wait for good things in life. :-) (Hope any of my team members 7reading this don't take a different cue from this. ;-))

7) Pour about half a cup of flour (about one serving of the spoon  in the pic above).

8) Wait for the bubbles to come up and the sides to harden up a bit. Approximately 2 minutes.

9) Flip it over and wait for another minute or so and....voila...

It's better served with a scoop of butter and of course with Maple Syrup

The Result...

(please bear with my presentation skills...still working on them...rather too hungry to eat rather to perfect the presentation) ;-)

Made a slight variation for Nandhitha:
Funny Face Pan Cake


She wanted a "Funny Face" pan cake as she had one in City Extra. :-)