Showing posts with label Chicken. Show all posts

Saturday, August 21, 2021

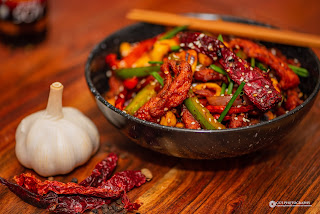
Dragon Chicken


Dragon Chicken - an "Indo Chinese" dish that caught my attention very recently. The term dragon could be because of how the chicken would look like or what your mouth could feel like after a few  bites. :) When I did a bit of research I was determined to try this rather sooner than later. This is very similar to Kung Pao chicken that is very popular in the US of A. This is an interesting recipe with a medley textures, flavours and colours. It's juicy, crunchy, spicy and a tinge of sweetness. So here's my take on this dish.


Ingredients

  1. Chicken breast - 500 gms
  2. Eggs - 2
  3. Ginger garlic paste - 1 tablespoon
  4. Dark soya sauce 
  5. Black pepper powder - 1 table spoon
  6. Corn flour - 2 table spoons
  7. Maida / All purpose flour - 1 table spoon
  8. Red food colour (optional) - 1 pinch
  9. Red onions - 2
  10. Red Capsicum - 1
  11. Green Capsicum - 1
  12. Garlic (minced) - 2 tablespoons
  13. Chilli jam (optional - can substitute with Chilli sauce if needed) - 2 table spoons
  14. Kashmiri red chillies - 5 or 6
  15. Dried red chillies (spicy one) - 5 or 6
  16. Cashews
  17. Sesame seeds - 2 tea spoons
  18. Sugar - 1 tea spoon
  19. Tomato ketchup - 2 table spoons
  20. Chives (or spring onions)
  21. Salt to taste
  22. Vegetable oil
Method
  1. Slice the chicken breast into very thin strips. It is important you cut it in strips and not diced.
  2. Make a batter with eggs, ginger garlic paste, pepper powder,1 table spoon of soya sauce, salt to taste, food colour, corn flour and maida.
  3. Marinade the chicken strips in this batter - at least for 30 minutes.
  4. Cut the onions and capsicums in strips.
  5. Deep fry the chicken strips in small batches.
  6. In a large wok heat the oil (I use the same oil used for frying the chicken).
  7. Toss the garlic, chillies and cashews for about a minute.
  8. Add the onions and capsicums and stir fry them for about a minute.
  9. Add 2 table spoons of dark soya sauce, chilli jam, tomato ketchup, sugar and mix well.
  10. Add the chicken and toss well to mix the chicken with the sauce.
  11. Add a few table spoons of water and toss well.
  12. Add  the sesame seeds and chives to garnish and give it a quick toss.

Enjoy!!

C
Wednesday, February 24, 2021

Hot and Sour Chicken Soup


Here's one of my favourite spicy and tangy Indo-Chinese soups that can warm up your body and mind. As in any soup the broth is what that makes or breaks it. While I've tried a different home made and store bought broths - here's a version which worked out well for me.


Ingredients


Broth

  1. Chicken with skin and bones. I used about 6 large chicken drumsticks.
  2. Garlic - 1 bulb smashed
  3. Ginger - 100 gms - cut and smashed
  4. Spring onion twigs - a few bumches
  5. Black pepper - 1 table spoon
  6. Salt - 2 table spoons
Soup
  1. Chicken broth - 4 cups
  2. Carrot - diced - 2 table spoons
  3. Cabbage - diced 2 table spoons
  4. Green chilles - diced - 2 table spoons
  5. Vinegar - 1/2 cup
  6. Dark soy sauce - 2 table spoons
  7. Corn flour slurry - 1/3 cup
  8. Eggs - 2  egg yolks and 3 egg whites beaten
  9. Seasme oil - 1 table spoon
  10. Cooked Shredded chicken - 1/2 cup 
  11. Spring onions - diced - 2 table spoons
Method

Broth
  1. In a large sauce pan or vessel boil the chicken for about 10-15 minutes.
  2. Drain the chicken and the water.
  3. Fill the same sauce pan with water, transfer the chicken, add the garlic, ginger, pepper and salt.
  4. Bring it to boil and then simmer it for about 30 minutes.'
  5. Take the chicken pieces out, let it cool and then remove the flesh out with hands or fork.
  6. Put the bones and skin back in the broth and let it simmer for another hour or so.
  7. Drain the broth out into a container.
Hot & Sour Soup

  1. In a sauce pan, saute the chillies, carrot and cabbage for about a minute in seasme oil and vinegar.
  2. Add the chicken broth and bring it to a boil.
  3. Once boiling add the corn flour slurry and bring it to boil.
  4. Add the soya sauce and mix well.
  5. Add the shredded chicken and mix well.
  6. Stir the soup mix well that the broth is rotating around.
  7. Add the beaten egg mix and twirl it around with a folk.
  8. Serve hot with a dash of spring onions as a garnish.

Enjoy!!

C


Sunday, July 5, 2020

Sweet Corn Chicken Soup


Sweet corn chicken soup - one of those soups that gives a meaning to "Chicken Soup for the Soul". It has all the goodness in it to bring your spirits up - especially on a gloomy cold night. After tomato soup this would have been one of my earliest memories of soup consumption - especially in a restaurant. There's something about the smell, the texture, the consistency and of course the flavour. So without much further ado - here's how to prepare sweet corn chicken soup - restaurant style - at home.


Ingredients

  1. Sweet corn - fresher the better. If not a frozen packet would do just fine. (2 cups)
  2. Chicken - Boneless - either thigh or breast pieces - thinly sliced or cubed
  3. Chicken stock - either store bought or stock made out of boiling chicken with bones for about an hour.
  4. Vinegar - 1 tablespoon
  5. Garlic - minced (1 tablespoon)
  6. Corn Flour - 50 gms
  7. Eggs - 2 (beaten)
  8. Milk - 1/2 cup
  9. Sesame oil - few tablespoons
  10. Spring onions (for garnish)
Method

  1. Take about 3/4th - 1 cup of the sweet corn and pulse it to create a rough / chunky mixture.
  2. In a large sauce pan or wok heat the sesame oil and saute the chicken and garlic for a few minutes. Saute until the pinkness is vanished in the chicken.
  3. Add the vinegar and give it quick toss.
  4. Add the sweet corn (whole and the chunky mixture) and saute for a few minutes.
  5. Add the chicken stock and milk and bring it to a boil.
  6. While the chicken stock is boiling, create a corn flour slurry by mixing water to the corn flour - about 1/4 cup.
  7. Once the stock has come to a boil add the corn flour slurry and let the soup thicken up for a few minutes. I like my soups thick - so if the consistency is not thick enough for you, prepare more corn flour slurry and add it to the soup.
  8. Once the soup is thick enough pour the beaten eggs in a circular fashion around the soup and stir it around in ONE direction with a fork. This should create the "egg flower" - which BTW is also another name for this soup in Chinese restaurants.
  9. Simmer the soup for 2-3 minutes.
  10. Serve hot with a garnish of spring onions.
Note: Some people like to have this with a bit of chilli vinegar mixed for a bit of a tangy and spicy flavour. If you would like it - just chop of a few green chillies in a few tablespoons of vinegar before you start this process.

Restaurant style - Indo Chinese - Sweet Corn Chicken soup ready!!


Happy Cooking!!

C

Wednesday, May 6, 2020

Chilli Chicken - Indo Chinese Style

Since the time I left India there is always a craving for good Indo Chinese food. Unfortunately there have not been many restaurants that fitted the bill. I ended up re-creating those dishes I was missing. Chilli chicken is definitely one of those. This can be made in a different ways - dry, semi-dry or with a bit of sauce. I like this as a starter and hence made the dry version. This is a great starter to go along with the drink of your choice or as a side dish for noodles or fried rice. So without further ado...


Ingredients

  1. Boneless chicken - 500 gms
  2. Eggs - 2
  3. Corn flour - 1.5 cups (add more as needed to get the required batter consistency)
  4. Maida / Plain Flour - 1/2 cup
  5. Red chilli powder - 1 tea spoon
  6. Onions - 1 - cut in cubes
  7. Green chillies - about a dozen depending on your spice appetite
  8. Vinegar - 2 table spoons
  9. Garlic - minced - 2 table spoons
  10. Ginger - grated - 1 tea spoon
  11. Sugar - 1/2 tea spoon
  12. Dark soy sauce - 1 table spoon
  13. Capsicum - 2 diced in cubes
  14. Vegetable oil
  15. Salt - to taste
Method
  1. Dice the chicken breast in small slices. It is important to cut / slice it thin and diagonally. DO NOT chop it in cubes. Idea is to make it cook fairly quickly or a flash fry.
  2. In a large bowl mix 2 eggs, corn flour, plain flour, red chilli powder and some salt. 
  3. Create a thick paste and add water slowly and create a smooth but thick batter. If too watery add little amounts of corn flour to make it thick.
  4. Marinate the cut chicken in the batter until you get done with other chopping / preparation tasks.
  5. Chop up the onions in small cubes.
  6. Slit the green chillies.
  7. Mince the garlic in small pieces.
  8. Grate about 2 inches or so of ginger to get about 1 tea spoon of grated ginger.
  9. Dice the capsicums.
  10. In a large hot wok fill about 1 cup of oil and heat it up. Test the heat by dropping a small piece of batter and it should pop up immediately.
  11. Fry the chicken pieces in batches and keep aside.
  12. Once done transfer the oil into a separate bowl, wipe it with a towel and heat it again.
  13. Pour a few table spoons of the oil.
  14. Once hot add the garlic, chillies and onions and saute for about 2 minutes.
  15. Add vinegar and sugar (to balance the pungentness of vinegar) and toss it up.
  16. Add the deep fried chicken pieces with the soy sauce and toss it up.
  17. Add salt to taste.
  18. Add the capsicums and toss it well.
  19. Make a corn flour slurry with a tea spoon of corn flour and few table spoons of water.
  20. Add the slurry and toss well for about a minute.
  21. If you want more sauce add about a cup of water and bit more of corn flour slurry and let it boil until a thick sauce is prepared.

Enjoy!!

C

Wednesday, April 22, 2020

Chicken Kolhapuri

Chicken Kolhapuri -  a Marathi delicacy was brought to my attention during my multiple visits to Bombay Talkies. This is one of my favourite restaurants here in Sydney (Harris Park). The owner recommended it once and we never looked back. It has such a different and refreshing flavour that was not usually found in the more common Punjabi or Chettinadu chicken curries. There was something different to it that I couldn't put my finger on. After a bit of research I realised the spices made all the difference. It was almost like the mix for Vaangi Baath but with that subtle twist which made all the difference. It is no surprise here since Kolhapur where this dish originated from is not too far from the Karnataka border. You will notice a good kannadiga / coastal influence. So here's my version of it with a few twists that Uma brought in. 

Ingredients

Masala (good enough for up to 2 kg of chicken)
  1. White Sesame seeds - 1 table spoon
  2. Desicated coconut - 2 table spoons
  3. Coriander seeds - 2 table spoons
  4. Red Chillies - 2 or 3
  5. Kashmiri Red Chillies - 3 or 4
  6. Cinnamon stick - a small twig about 1 to 2 inches
  7. Cloves - 4 to 5
  8. Cardamom (Green) (Elaichi) - 4 or 5 pods
  9. Poppy seeds (Khus khus) - 1 table spoon
  10. Cumin - 2 tea spoons
Curry
  1. Chicken with bones (1.5 kg)
  2. Large red onions - 2 (diced)
  3. Tomatoes - 3 (diced)
  4. Ginger Garlic Paste - 2 table spoons
  5. Kolhapuri Masala (from above) - 3 to 4 table spoons
  6. Kashmiri red chilli - 4 or 5
  7. Ghee - 2 table spoons
  8. Turmeric - 1 teaspoon
  9. Coconut milk - 220 ml
  10. Mint leaves - a handful
  11. Coriander leaves - 1 handful (chopped)

Method


  1. Dry roast the ingredients of the masala and keep it aside to cool down to room temperature.
  2. Grind them to a coarse powder.
  3. Chop up the chicken to small pieces, wash and rinse them.
  4. Add the powdered masala, turmeric with the ginger and garlic paste on the chicken and mix them up and let it marinade about 30 minutes.
  5. While the chicken is marinading heat up a large kadai (sauce pan) with about 3 to 4 tablespoons of any vegetable oil.
  6. Once hot, saute the onions until they turn slightly brown.
  7. Add the tomatoes and saute until the mixture turns mushy and oil separates.
  8. Let this onion-tomato mix cool to room temperature.
  9. Once cooled down blend this mixture to a smooth paste.
  10. Heat the same kadai with about 1/3 cup of vegetable oil.
  11. Once hot add the blended paste and saute until oil separates.
  12. Add the marinaded chicken along with the mint leaves and cook well (in medium heat / flame) with a closed lid for about 20 minutes. 
  13. Keep mixing it up with a little bit of water ( to the level of consistency preferred) so that the masala mixes well and the chicken doesnt get burnt.
  14. Add the coconut milk and let it boil for another 5 minutes.
  15. In a separate kadai or a large spoon add the ghee and kashmiri chillies and lightly roast it for a few seconds until the chillies expand in size.
  16. Add this chilli and ghee to the curry, garnish with coriander leaves and serve hot with roti/naan/chappati or steamed rice.

Enjoy!!

C


Wednesday, May 1, 2019

Chicken Lollipops

Chicken Lollipop known by many different names - Chicken Drumstick, Drums of Heaven etc., has been huge hit recently at home while we visit an Indian restaurant nearby. My kids call it "the lollipop restaurant". This is an awesome indo-chinese appetiser (entree) that I tried ages ago and almost forgot about it since not many restaurants outside India served this delicacy. So after a few visits was inspired to recreate it at home. It took a few tries and knowing what part of chicken was best to use. This goes best with Schezwan sauce which will be coming up soon at Chetty's Kitchen.


Ingredients
  1. Chicken wings - at least 4 per person (unless you want a dog fight at home). I bought 16 for the four of us. Make sure you buy the smallest chicken wings possible and the one without the shoulder piece or the winglet.
  2. Corn flour - 1/2 cup
  3. Plain Flour (Maida) - 1 cup (the ratio between Cornflour to Maida should be 1:2 whichever measurement you use)
  4. Egg - 1
  5. Ginger garlic paste - 1 table spoon
  6. Salt - to taste
  7. Lemon juice - 2 tea spoons
  8. Light Soya sauce - 2 table spoons
  9. Kashmiri chilli powder - to taste
  10. Red food colour - 2 pinches (totally optional)

Method

  1. Take a chicken wing and feel out the 2 bones. There will be one thin bone and a thick one. Run a knife around the thin bone, scrape the flesh and remove the bone (by twisting it out).
  2. Run the knife around the remaining bigger bone and scrape the flesh down.
  3. Push the flesh down towards the other end of the bone and roll it up into a ball (loosely). The lollipops are formed now.
  4. In a large bowl mix the ingredients for the marinade - ginger garlic paste, lemon juice, soya sauce, kashmiri chilli and salt.
  5. Marinade the lollipops in the above mix for at least 30 minutes.
  6. While the chicken is being marinated prepare the batter with the egg, corn flour, plain flour, kashmiri chilli powder, salt and food colour. Prepare a fairly thick batter by adding water slowly. 
  7. Heat a deep sauce pan / kadai with vegetable oil. Enough oil to have at least 3 to 4 cms depth. Once hot move the heat to medium / low heat.
  8. Dip the chicken lollipop in the batter and roll it smoothly to maintain the ball shape and immerse them in the hot oil.
  9. Cook on medium heat for about 7 minutes occasionally turning them around.
  10. Drain and serve hot with a spicy Schezwan sauce. You can decorate the bone tips with aluminium foil if you would like.
The result is a crunchy on the outside but juicy on the inside Chicken Lollipop!!

Enjoy!!

C

Thursday, April 11, 2019

Creamy and Spicy Chicken Pasta

It's a common misconception that pasta is typically bland. There is whole range of pasta dishes that can prepared spicy to suit our taste buds. My introduction to pasta was in the form of a masala version of macaroni and cheese that my mom used to prepare. After a few decades I found a version in one of the Italian restaurants (Johnny Carinos to be specific) in USA. A version was posted a while ago (ignore the images though). Since then we have been trying out different spicy variations of pasta. Here is one such recipe inspired by Tasty. So without further ado...

Ingredients
  1. Olive oil - 3 to 4 table spoons
  2. Boneless chicken breast chunks - 600 gms
  3. Mushrooms (I used the brown swiss mushrooms) - 150 gms
  4. Diced Onion - 1
  5. Minced garlic - 1 whole garlic 
  6. Thinly sliced sundried tomatoes - 3 to 4 table spoons
  7. Chicken stock 500 ml
  8. Plain flour (Maida) - 1 tablespoon
  9. Heavy cream 350 ml
  10. Pasta (I used Farfalle any variety other than spaghetti (or noodle like) will work) - 300 gms (1 packet)
  11. Shredded parmesan cheese - 100 g
  12. Cayenne Pepper - to taste as per your spice levels
  13. Black pepper - to taste
  14. Chopped Parsley for garnish

Method

  1. Boil and drain the pasta as per the instructions on the package. Add a pinch of salt.
  2. In a large sauce pan heat the olive oil and saute the diced chicken with a bit of salt and pepper       for about 5 minutes until cooked to about 3/4ths - just until you don't see anything pink. 
  3. Move the chicken out to a separate bowl.
  4. Add some more olive oil and saute the garlic, onions, mushrooms and sundried tomatoes.
  5. Add salt and cayenne pepper to taste. Note that the chicken stock will come with a bit of salt too.
  6. Once the onions are carmelized (brown in colour) add the chicken stock and heavy cream and bring it to boil.
  7. Add the plain flour to thicken the sauce and simmer it for about 5 minutes.
  8. Add the boiled and drained pasta and stir it well.
  9. Add the grated parmesan cheese and stir well.
  10. Garnish with chopped parsley and bit of parmesan cheese and serve hot.


Enjoy!!

C

Monday, April 8, 2019

Andhra Style Ginger Chicken

When it comes to chicken curries each state (probably even districts) seems to come up with a variation that's a specialty to that area. While I don't know which district this came from - ginger chicken curry is definitely a favourite of mine while dining at an "Andhra style" restaurant. As the name denotes this is a chicken curry with a slightly stronger tinge of ginger in it which gives a punch to the curry. I am sure this can also be enjoyed in a semi gravy style simply by reducing the amount of water.

Ingredients

  1. Red onions - 3
  2. Tomatoes - 2
  3. Ginger & Garlic paste - 2 table spoons
  4. Ginger juliennes - 50 gms
  5. Fennel seeds - 1 table spoon
  6. Cumin - 1 tea spoon
  7. Cardamom seed - 1 tea spoon
  8. Coriander seeds - 2 table spoons
  9. Poppy seeds - 1 tea spoon
  10. Cinnamon sticks - 1 or 2
  11. Kashmiri red chillies - 4 or 5
  12. Cloves - 3-4
  13. Chicken with bones - 1kg (diced)
  14. Gingelly oil
  15. Curry leaves
Method

  1. Dice the onions roughly and saute them in gingelly oil with a pinch of salt.
  2. Dry roast the spices (Ingredients #5 - 12) for about a minute until the aroma comes out.
  3. Let it cool down to room temperature and then blend it to a nice powder.
  4. Once the onions are golden brown add the tomatoes and saute them until they get mushy.
  5. Add the ginger garlic paste and half of the ginger juliennes and saute them until oil separates.
  6. Add the diced up chicken pieces and mix it well.
  7. Add the powdered dry spices and mix it well.
  8. Cook in a medium flame with a lid on for about 20 minutes. Add a cup of water to the level of consistency you prefer.
  9. Add the remaining ginger juliennes with curry leaves and simmer for a few minutes. 

Enjoy!!

C

Thursday, November 29, 2018

Chicken Manchurian - quintessential dish that features in every Indian restaurant that serves "Indo-Chinese" cuisine. I do not remember any visit to a  (Indian) Chinese restaurant that did not have A "manchurian" in the order. It could be Gobi (Cauliflower) or Paneer or most often as the case is - Chicken. It usually comes in 2 variations either as "Dry" which is served as an appetizer (entree/starter) or "Gravy" which is usually served as an accompaniment to fried rice or noodles. So here is the gravy version. If you would like the dry version just follow the notes below (step #7).

Ingredients

  1. Chicken breast fillet - 500 gms
  2. Minced garlic - 2 table spoons
  3. Minced red onions - 1 large onion
  4. Corn flour - 3 table spoons for batter and 1.5 table spoons for sauce
  5. Plain flour (Maida) - 1/2 cup
  6. Red chilli powder - 1 tea spoon
  7. Eggs - 2
  8. Soya Sauce - 2 table spoons
  9. Vinegar - 1 table spoon
  10. Sugar - 1 tea spoon
  11. Spring onions - 1/2 cup for garnish
Method
  1. Thinly slice the chicken breast fillets. Make sure you don't cut them into cubes.
  2. In a deep bowl mix the chicken with eggs, corn flour, plain flour, chilli powder and salt (about a tea spoon). Do not add any water. You should just have a thin coating of the batter on top of the chicken.
  3. In a large wok heat about 2 cups of vegetable oil (or enough to deep fry).
  4. Deep fry the chicken pieces in a few batches. It should take about 30 seconds to a minute for each batch. This is where the thinly sliced chicken pieces come in handy.
  5. Transfer the excess oil into a separate bowl and use the same wok with a few table spoons of oil left.
  6. Saute the garlic and onion until the onion turns slightly brown.
  7.  Add vinegar and soya sauce mix it up well. (If you want the dry version avoid step #8 and add about 1 table spoon of corn flour slurry for the smooth texture).
  8. Pour about 2 cups of water (or more if you need more sauce) and bring it to boil.
  9. Mix the 1.5 table spoons of corn flour in half a cup of water and bring it to boil until the sauce thickens. (Adjust the water or corn flour slurry to desired thickness of sauce)
  10. Mix the deep fried chicken pieces and mix it up for about a minute.
  11. Serve hot with diced up spring onions as garnish. As mentioned above a good combination with noodles or fried rice.


Happy Cooking !!

C

Sunday, June 17, 2018

Chicken Tikka Masala

Chicken Tikka Masala (CTM) - probably the most globally well known Indian curry. I still remember being excited about finding this quintessential curry in a train from London to Edinburgh. This is one curry that I would try first in a new North Indian restaurant to assess the "repeat value" depending on how good they can make it. Some of the key characteristics of a CTM is its tangy, spicy, silky, juicy, orangy and of course yummy. Now I have a lot of vegetarian friends who've been asking for a recipe for Paneer Tikka masala. It's quite simple - just replace - yes literally replace the word Chicken with Paneer in this recipe and there you go. One needs a bit of patience with this recipe since it has a few steps involved and a variety of ingredients.

Ingredients

Boneless Chicken - either breast or thigh pieces 1/2 kg or 1 pound

Tikka Marinade
  • Turmeric - 1 tea spoon
  • Green Chillies - 3 or 4
  • Yogurt - 2 table spoons
  • Lemon juice - 1 table spoon
  • Red chilli powder - 1 table spoon
  • Ginger Garlic paste - 2 table spoons
  • Salt - 1 tea spoon
Masala Dry Ingredients
  • Raw cashews - 4 or 5 pieces
  • Cumin seeds -  1 table spoon
  • Bay leaf - 1
  • Cinnamon sticks - 3
  • Green Cardamom - 4 or 5
  • Cloves - 1 tea spoon
  • Kashmiri Chilli powder - 1 or 2 tea spoons
  • Onions

Masala Wet Ingredients
  • Tomato paste - 2 table spoons
  • Ginger garlic paste - 2 table spoons
  • Full cream milk - 1/2 cup
Other 
  • Coriander powder - 2 table spoons
  • Garam masala powder - 1 table spoon
  • Kasuri methi leaves - 1 table spoon
  • Coriander leaves - for garnish - a handful
  • Vegetable oil - few table spoons
The Method

  1. Blend all the ingredients in the Tikka Marinade ingredient list to a smooth paste.
  2. Marinade the chicken either as a whole or in cubes for a few hours - preferably overnight
  3. Heat a large sauce pan with vegetable oil and saute the ingredients under the "Masala Dry Ingredients" group for a few minutes until the onions turn brown. Start with the spices first and then the onions.
  4. Set this aside to cool to room temperature.
  5. Heat a large grill pan or tava and grill the marinaded chicken until they are almost cooked. 

    Spray with oil as necessary. This should probably take about 5 - 7 minutes per load. If you are using paneer just grill it for a few minutes until the masalas are browned up.
  6. Once cooked cut it into bit size chunks in case they were not cubed up already.
  7. Blend the sauteed masala into a smooth paste. 
  8. Transfer the paste back into the sauce pan through a metal sieve. You may add some water as needed since the paste will not filter through easily.
  9. Saute the masala paste along with ginger garlic paste on medium flame/heat for a few minutes.
  10. Add the tomato paste, coriander powder, garam masala and crushed up kasuri methi.
  11. Saute this mixture until oil separates.
  12. Add the milk and few cups of water to required consistency.
  13. Bring it to a boil and add the chicken pieces and mix evenly.
  14. Let the curry come to a boil for another 5 - 6 minutes.
  15. Garnish with freshly chopped coriander leaves.

Chicken Tikka Masala ready!! Serve hot with rotis or steamed basmati rice.

Happy Cooking!!

C

Wednesday, September 6, 2017

Chettinadu Kozhi Varutha Curry - Chettinadu Chicken Curry with Roasted Spices

It was during the later part of my 20s when I was introduced to Chettinadu cuisine in restaurants like Anjappar, Karaikudi etc in Chennai. After I moved overseas I had missed it for quite some time until Anjappar started spreading its wings globally. Invariably these restaurants have this dish in their menu - "varutha curry". Recently we had been to a Chettinadu restaurant Grand Chettinad that was newly opened in our area. They had the same dish and it tickled my interest to try it out at home. I had to do a bit of research on this since there were quite a few variations from different chefs. Interestingly there was one North Indian chef who attempted this who pronounced Kozhi as Kozee and of course I ignored the rest of his recipe video. Chettinadu is famous for various chicken curry recipes. I have attempted a few myself - Milagu Kozhi - Pepper Chicken and my very first Chicken Chettinad (after which my nickname of Chicken Chetty came around). The main difference in varutha curry recipe is that you roast all the spices - wet and dry before you add it in the curry. So...long folks - now to the details.

Ingredients

Dry Masala (Spices) - pretty much your entire spice box
  1. Dry Red Chillies (key for any Chettinadu recipe)
  2. Star anise
  3. Cinnamon sticks
  4. Fennel seeds
  5. Cumin seeds
  6. Coriander seeds
  7. Cloves
Wet Masala
  1. Shallots or Red Onions 
  2. Shredded Coconut
  3. Cinnamon sticks
  4. Green cardamom seeds
  5. Poppy seeds
  6. Curry leaves
Marinade
  1. Chicken - chopped in 1-2 inch blocks with and without bones (drumsticks go as is)
  2. Ginger garlic paste
  3. Turmeric powder
  4. Red chilli powder
Other
  1. Tomatoes (pureed)
  2. Curry leaves - for garnish
  3. Mustard seeds
  4. Gingelly Oil
The Method
  1. Marinade the chicken in ginger garlic paste, turmeric powder and chilli powder. Set it aside for about 30 minutes. Pretty much until you complete the other masala steps.
  2. Dry roast the ingredients under "Dry Spices" until you can hear a bit of crackle and smell the aroma of the ingredients. Set this aside to cool down to room temperature.
  3. Grind these ingredients into a smooth powder.
  4. In a pan heat a few tablespoons of gingelly oil and saute the wet ingredients. 
  5. Start with the cinnamon sticks, poppy seeds, green cardamom and curry leaves. 
  6. Add the onions and saute until they turn slightly golden. 
  7. Add the grated coconuts finally and saute until coconut turns slightly brown. (Takes about 5 minutes in all)
  8. Set the wet roasted spices aside to cool down to room temperature.
  9. Blend the wet masala into a coarse to smooth paste.
  10. Heat a large sauce pan and add a few tablespoons of gingelly oil.
  11. Add mustard seeds and saute until they splatter.
  12. Add the marinaded chicken and dry masala and saute until the chicken is half cooked. Usually about 10 minutes.
  13. Add the wet masala and saute for about 5-10 minutes.
  14. Add the tomato puree and salt and saute for about 5 minutes until the puree is blended well.
  15. Add as much water as needed to get the amount of curry and consistency you are after. Remember it is not expected to be too thin.
  16. Leave it to cook until chicken is cooked well and the oil separates.
  17. Garnish with curry leaves and serve hot with rice or parotta.

Enjoy Cooking!!

C

Tuesday, August 8, 2017

Kadai Chicken a.k.a Chicken Karahi


Kadai Chicken also known as Chicken Karahi is again one of those dishes you would find in most Indian restaurants.  This is usually made almost like a stir fry - but I made it a slightly saucy version. Kadai Chicken comes with a good mix of flavours and textures. A bit of tangyness from the tomatoes, a bit of crunch from the bell peppers (capsicums), sweetness from the onions and of course a bit of kick with the ginger julienne added as a garnish. This is a fairly quick one to prepare. This came up as a last minute dinner plan with an end to end preparation time within 30 minutes. Of course there is also distant cousin Kadai Paneer which is also prepared in a similar way with Paneer. Goes very well with warm rotis (or chappatis).


Ingredients

  1. Diced chicken breast 
  2. Onions - cut in cubes
  3. Capsicums / Bell Peppers (Green) - cut in cubes
  4. Tomatoes - roughly cut
  5. Tomato paste - 1 tablespoon purely for colour
  6. Ginger Garlic paste - freshly ground
  7. Cashews - 2/3
  8. Salt
  9. Red Chilli powder - preferably Kashmiri chilli for colour
  10. Cumin powder
  11. Coriander powder
  12. Garam masala
  13. Kasuri Methi - dried fenugreek leaves
  14. Milk
  15. Ginger julienne - for garnish
  16. Coriander leaves - for garnish


Method

  1. Saute the cashews, onions (3/4ths of quantity diced) and tomatoes in any vegetable based oil until the tomatoes are mushy and set aside to cool.
  2. You can dice the chicken while the onions / tomato cools down.
  3. Blend the sauteed cashew, onion and tomato mix into a smooth paste
  4. Heat a kadai (sauce pan) with oil and saute the blended paste along with ginger garlic paste and a tomato paste.
  5. Saute until the oil separates and the raw flavour is gone.
  6. Add salt, garam masala, cumin powder, coriander powder, kasuri methi (crushed into a powder in your palm), chilli powder and saute for a few minutes until the spices are blended well.
  7. Add the chicken pieces and cook with a closed lid for about 10 minutes.
  8. Add water as much as needed for the sauce. Ideally prepared without water.
  9. Add a dash of milk - whole cream version. You can substitute with cream as well.
  10. Add the remaining onions and capsicums and saute for about 5 minutes. Need to stop before the capsicums 
  11. Add a tea spoon of garam masala at the end.
  12. Garnish with ginger julienne and coriander leaves.
Restaurant / Dhaba style Kadai Chicken ready!!

Happy Cooking

C

Monday, March 28, 2016

Chicken Jalfrezi - Bengali Hot Chicken Curry

Chicken Jalfrezi - one of those dishes almost always found in many Indian restaurants that serves North Indian dishes. Little did I know earlier that the roots for this dish is actually from Bengal. "Jhal" meaning "Hot" in Bengali (apparently). Some websites claim that Jalfrezi has taken over Chicken Tikka as the No.1 dish for UK. This is again a dish I got introduced during my Bangalore Days. A spicy, tangy, thick, chicken curry suitable for roti or rice. There are multiple recipes available on the web, here's my version with a slight twist here and there. 


Ingredients
Ingredients for curry paste
  1. Chicken
  2. Onions
  3. Tomatoes
  4. Tomato Paste
  5. Green Chillies
  6. Dried Red Chillies
  7. Ginger Julienne
  8. Cashew
  9. Poppy seeds
  10. Garam Masala
  11. Cumin Seeds
  12. Cumin Powder
  13. Ginger and Garlic paste
  14. Cumin Powder
  15. Red Chilli Powder (If possible both regular and Kashmiri Chilli for the colour)
  16. Amchur Powder
  17. Turmeric Powder
  18. Vinegar
  19. Tomato Ketchup
  20. Ghee
Method

1) Take about half of the onions, few tomatoes, green chillies, poppy seeds, and cashews and grind it into a smooth paste.
2) Heat a large kadai and add a few tablespoons of vegetable / canola oil.
3) When oil is hot add cumin seeds and dried red chillies and saute until you get the cumin and chilli "fragrance" out.
4) Add the paste done in step #1, ginger garlic paste and saute well until oil separates.
5) Add chicken, few tablespoons of vineger, about a tea spoon of tomato paste, pinch of turmeric powder, tea spoon of cumin powder, red chilli powder, half a teaspoon of Amchur powder, garam masala and salt to taste.
6) After the chicken is say about 1/3rd cooked, add a tablespoon of tomato ketchup (or sauce depending on which part of the globe you are from), add the remaining onions, ginger julienne saute for a few minutes.
7) Add water and let the curry boil to thicken as needed. Watch out not to add too much water as this is meant to be a thick curry. Do also note that the cashew paste will assist in thickening this up later. By now you should be able to smell the tangyness in the curry.
8) Once the curry has reached the required consistency (by when the chicken must have been cooked as well), add a good dollop of ghee to give the curry a rich and creamy texture. Let it simmer for a few minutes.
9) The curry is done once you can see the oil separated and has reached the consistency you need.
10) Garnish with coriander leaves and serve hot with roti/chappati or rice.


Happy Cooking!!

C

Sunday, August 30, 2015

Ginger Chicken Curry - Andhra Style

Bangalore days has introduced quite a bit of culinary treats especially introducing me to "Andhra Style" cuisine. One such dish that kept haunting me for a while that I don't get to eat in Australia is Ginger Chicken. There are different recipes floating around the web for "Andhra Style Ginger Chicken". Most of them seem to be some Indo-Chinese dish, but not what you would get in a Krishna Chinai or Nagarjuna's or the likes. It is that chicken curry that is spicy in it's own way but with a distinct gingery flavour. Chicken curries in general have almost the same ingredients whichever style you cook i.e., ginger garlic paste, onions sometimes tomatoes. I believe the difference is in the dry masala that goes in. Each street, state, region has it's own specialty and the spices make the difference. The choice of black pepper vs dried red chillies and so forth. So here is A version of ginger chicken curry with freshly ground dry masala with slight differences compared to say a Chettinad Chicken curry.

What goes in

Dry Masala

1) Red Chillies
2) Curry Leaves
3) Cumin Seeds
4) Coriander Seeds
5) Cinnamon
6) Cloves
7) Poppy Seeds (Khus Khus)

Wet Masala

1) Onions
2) Ginger
3) Garlic
4) Tomato Paste (for the colour)


Few other things
1) Chicken - preferably with bones
2) Vegetable Oil
3) Mustard Seeds
4) Kasoori Methi leaves
5) Salt
6) Garam Masala
7) Turmeric powder
8) Coriander leaves (for garnish)

Preparation


1) Roast the spices for the dry masala individually and keep them aside to cool down. Remember to stop roasting as soon as you can smell the flavour of the spice.

2) Blend the ingredients of the wet masala (except the tomato paste) into a smooth paste. You should be able to smell the ginger in the paste distinctly. If not add more ginger.
3) Heat a sauce pan with vegetable oil and temper the mustard seeds once oil is hot. 
4) Add the wet masala, the tomato paste paste and methi kasoori leaves and saute until the oil separates along with some salt.
5) While the wet masala is getting cooked grind the dry masala into a fine powder. Feel free to hike up the heat with more chillies if you like. I had to keep it slightly under control so kids can eat as well.

6) Once the wet masala is cooked i.e., the oil has separated with a rich red colour paste,  add the chicken in along with a pinch of turmeric powder.

7) After the chicken is cooked for a few minutes add the dry masala powder and mix well.
8) Keep stirring for a few minutes and add water to the amount of gravy needed. This is meant to be relatively thick curry so watch out on the water.
9) Leave the chicken to cook with a lid on for about 20-25 minutes.
10) Add thinly sliced ginger juliennes and cook for about 5 minutes.
11) Stop the stove and garnish with coriander leaves.

Ginger Chicken - Andhra Style Ready !!


Serve hot with parotta or rice.

Happy Cooking !!

C

Sunday, August 9, 2015

Chicken Biryani - Tamil Nadu Style

Chicken Biryani - a dish that is so "supreme" that it has so many forms and versions - not just within India but across Asia - if not the world. I understand that there are about 15 different Biryani types available in India. Given it's Persian origin, it is also called by many other names in the middle east. One that I have enjoyed myself is a Kabsa. As with all the different varieties not all may be enjoyed by all. I remember during one of my visits in Muscat where a biryani meant a cup of flavoured rice and a deep fried chicken leg on the side. Now that was simple!! I still remember the very first Biryani attempt made about 13 years ago in Portland. Since then there has been many stories around it. One including one of our neighbours coming in to rescue while attempting Hyderabadi Dum Biryani. So here's my first version that is most familiar to me - Tamil Nadu style. Before I go too far - this was prepared by Uma including the photo credits. 

What goes in
  1. Onion
  2. Cardamom
  3. Ginger
  4. Garlic
  5. Cinnamon
  6. Clove
  7. Bay Leaves
  8. Aniseed
  9. Green Chillies
  10. Fennel Seeds
  11. Tomato
  12. Vegetable Oil
  13. Ghee /Butter
  14. Mint
  15. Coriander Leaves
  16. Biryani Masala (optional)
  17. Chicken
  18. Basmati Rice (Washed)
  19. Turmeric Powder

The Method

  1. Blend, onion, garlic, ginger, cinnamon and clove to a paste.
  2. In a pressure pan / cooker melt ghee/butter and oil. When hot, sautee bay leaves, aniseed, green chillies and fennel seeds for few minutes.
  3. Add mint and coriander and sautee for few minutes.
  4. Add the blended mix from step 1 and sautee until oil separates.
  5. Add tomato and sautee for few minutes.
  6. Add chicken with a pinch of turmeric powder, Biryani masala, salt and sautee until chicken is half cooked.
  7. Add basmati rice, mix well and pour water (1.5 cup water : 1 cup of rice).
  8. Pressure cook for 2 whistles.
Chicken Biryani Ready!!


Happy Cooking!!

C

Sunday, July 26, 2015

Chettinad Pepper Chicken Curry - Milagu Kozhi Kozhambu

So I had this sinus bothering me for the last few weeks travelling between winter and tropical weather back and forth almost every week. Decided to get it treated with some pepper chicken. It was a good treatment even while I was cooking. Just the aroma made the difference. Talking about pepper chicken curry, still the best in my opinion is from Parasakthi in Salem. Hopefully someday I will be able cook up something close to that. This was yet another attempt. The best parts of cooking a curry is roasting the masala. As I have mentioned in an earlier post each spice needs to be dry roasted separately to get the best effect. Of course it takes a little bit of time and patience - but worth every bit of it.

What goes in:

Dry Masala (starting from top left in the pic )
  1. Star aniseed
  2. Coriander seeds
  3. Cloves
  4. Fennel
  5. Black Pepper
  6. Poppy seeds (Khus Khus)
  7. Cinnamon sticks
  8. Cumin
"Wet Masala"
  1. Onions
  2. Garlic
  3. Ginger
  4. Tomato
Other Stuff
  1. Chicken
  2. Grated coconut
  3. Gingelly oil
  4. Turmeric
  5. Salt
  6. Black Pepper Powder
  7. Mustard seeds
The Method
1) Blend the ingredients of the wet masala.
2) Roast the dry masala ingredients one by one and let it cool down.
3) Heat a sauce pan and once hot add few table spoons of gingelly oil.
4) Add mustard seeds once the oil is hot.
5) Add the blended wet masala paste, a teaspoon of salt and saute for a few minutes until the oil separates.
6) While the paste is being sauteed powder the dry masala.
7) Once the paste is sauteed enough add the chicken pieces, pinch of turmeric and saute until the chicken is mixed well with the paste.
8) Add the powdered masala, grated coconut, curry leaves and let it to cook for about 15-20 minutes until the chicken is cooked enough. Add required amount of water for the level of consistency needed.
9) Add some black pepper powder if you are not able to get the distinct peppery taste.
10) Garnish with coriander leaves.


Muzhagu Kozhi Kozhambu Ready!! Goes well with steamed rice or parotta.

Happy Cooking!!

C

Monday, July 6, 2015

Gai Pad Krapow - Chilli Basil Chicken

Basil - a leaf limited to religious and maybe medicinal purposes in Indian lifestyle add so much flavour to a dish especially Thai and Italian. One of my favourite Thai dishes - stir fried Chilli Basil Chicken came to fruition today at Chetty's kitchen. All necessary ingredients fell into place today and there was no reason not to try. There's something about the Thai birds eye red chilli. It simply couldn't be replaced by any other type of chilli and the flavour just doesn't happen. No wonder these 2 ingredients Basil & Chilli make a dish by itself.

What goes in: 
1) Thinly sliced Chicken breast meat
2) Thai Red Chillies
3) Holy Basil Leaves
4) Onions
5) Garlic
6) Fish Sauce
7) Dark Soy Sauce
8) Sugar
9) Corn flour water (optional)


The Method

1) Heat a wok with a few tablespoons of vegetable oil - any oil for that matter.
2) When hot toss in the chicken and toss it around until the pinkness goes away.
3) Mix in the garlic, chillies, few tablespoons of fish sauce, 1 table spoon of soya sauce, 1 teaspoon of sugar and fry for about a minute.
4) Toss in the onions and toss for a few minutes until the onions become slightly translucent.
5) Add in the basil leaves and toss for a minute.
6) If you need a extra sauce (or volume), add more water and corn flour water. You may need to add more fish sauce / salt as necessary.

Serve it hot with jasmine rice. 

Voila - Gai Pad Krapow Ready!!


Enjoy Cooking!!

C

Sunday, March 10, 2013

Kari Ayam - Malaysian Chicken Curry

Kari Ayam (Chicken Curry in Malaysian) - one of those dishes I have not had much but always wanted to. The problem with going to a favourite Malaysian restaurant after a long time is you end up wanting to eat your regular favourite and not attempt to explore much. This is one of those dishes and I thought of giving it a shot at home.
Kari Ayam as you would see is very much like a South Indian chicken curry - with a south east asian twist. The ingredients that go in make it Indian, Thai and somehow made it to be Malaysian. It is best consumed with Roti Canai or rice - preferably Hunan Chicken Rice.
Ingredients

  1. Chicken - preferred with bones
  2. Star anise
  3. Cinnamon sticks
  4. Shrimp paste
  5. Garam Masala / Curry Powder 
  6. Coconut milk (or cream)
  7. Special Paste
    • Shallot (Small Onion)
    • Red Onion
    • Ginger
    • Garlic
    • Lemon Grass
    • Galanga (optional - used it because I had it already mixed)
Method
  1. Heat oil in a large pan and fry cinnamon, star anise and shrimp paste for a few seconds until you can smell the spices.
  2. Add the "Special Paste" and saute for a few minutes until oil separates.
  3. Add coconut milk and saute for a few minutes.
  4. Add chicken , turmeric powder, garam masala / curry masala ,salt and saute for about 5-10 minutes.
  5. Add coconut milk and water slowly as required to the required amount of consistency and sauce. This dish is usually watery, but you can always choose your own level of consistency.
  6. Add curry leaves to get the extra kick.
  7. Stop cooking when you are able to easily break open a piece of chicken with a fork and nothing pink is visible inside. Key is to stop when the meat is juicy - not hard.
Note: This dish usually has potato in the curry - but I chose not to. Feel free to add large size potato cubes along with the chicken.

Serve hot with rice or roti canai.

Enjoy!!

C

Friday, July 20, 2012

Gong Bao Ji Ding aka Kung Pao Chicken

Ni Hao!! If you followed my Shanghai Connection it might be obvious on what my next recipe should be. Yes, I have been influenced... Kung Pao Chicken was one of my staple lunch diets at Panda Express at Lloyd Center mall along with Black Pepper chicken and Chowmein. I guess that was the one of the few "spicy" chinese dishes I could have almost anywhere in US. After a few years they came up with Kung Pao Prawns - not sure if they still have it. Anyways...had an opportunity to experiment this out for a few guests at home last week. After a long contemplation between Gong Bao Ji Ding (traditional Chinese name) and Black Pepper, ended up with Gong Bao. 

Ingredients

1) Chicken breast fillets
2)  Raw peanuts (skin less)
3)  Dried Red Chillies
4) Soy Sauce
5) Chinese Cooking Wine
6) Spring onion (bottom white part only)
7) Corn flour
8) Vinegar 
9) Minced Garlic

Of course you can add some red capsicum (bell pepper) to add some colour.

The Method

For a dish that looks simple it's actually a bit of a process involved. It had to be done in different phases.

1) Marinade the the diced chicken breasts in soy sauce with a bit of salt and corn flour powder. 
2)  In a large wok, add a few "generous" tablespoons of oil and fry the red chillies and peanuts for a few minutes. Try not to burn the red chillies. You can stop when you see some brown spots on the peanuts. Strain the fried mixture from the oil and set aside. By this time the wok should've got a nice smoky nutty flavour.
3) In the same oil (please note it has to be the same oil) shallow fry the chicken for a few minutes. Add a dash of vinegar and rice wine as the chicken cooks. You will have to ensure the chicken is cut in such a way that it cooks in a few minutes. Strain the chicken (if you still have excess oil) and set aside.
4) Sautee the garlic and shallots in few tablespoons of oil (use remaining oil if available after frying the chicken).
5) Mix the chicken along with a few dashes of soy sauce, rice wine and vinegar. 
6) After a few tosses with the chicken add the peanut / chilli  mixture and toss it around. If you had some red capsicum now would be a good time. Check and add some salt to taste as required.

Gong Bao Ji Ding ready... 

Serve hot with steamed rice or just by itself as an appetizer.

Happy Cooking!!

C

Saturday, December 24, 2011

Murgh Makhani aka Butter Chicken

As they say...when it rains it pours. After a long break trying to get back into the groove and catch up on the posts. Niven - Sorry mate Chopsuey is yet to come. :-)

The very first time I "cooked" butter chicken was in Yercaud. We 3 Mustkeers wanted to experiment cooking butter chicken at THE Nanjam. I must've been in my 7th or 8th class at the most. I think we were inspired at that time by many things...can't recall exactly. But we did want to cook "Butter Chicken". We got a whole chicken but a stick through it, lit up a bon fire and started roasting it with by basting loads and loads of Amul butter.  The result of course was a few days of eating Lomotil. It was only after several years did I get to know that Butter Chicken is a staple Punjabi chicken delight. One of the dishes I normally eat to "test the waters" in any new Indian restaurant. If they get this right, they usually have a good chef in place. For a long time I've always thought this is one of those dishes that is best done by a professional. After a bit of research from a few websites was able to get to something pretty close. It does takes a bit of work, but the outcome was worth every minute spent. A word of caution to those who are calorie conscious - this definitely is not a dish for you.

What goes in:
1) Butter
2) Cream
3) Chicken
4) Tomatoes
5) Tomato paste
6) Onions
7) Red chillies
8) Ginger juliennes
9) Ginger & Garlic paste
10) Garam masala spices (Bay leaf, Cinnamon, Star aniseed, green elaichi (most important), cloves, cumin seeds
11) Coriander powder
12) Kasuri Methi. - Wonder what the magic is in that unassuming dried methi leaves.
13) Honey

The process:

Butter chicken has to be done in 2 phases.

Phase 1
1) Make a paste with the following:
   a) Ginger garlic paste
   b) Red Chilli powder
   c) Coriander powder
   d) Salt
2) Marinate the chicken in the above paste.
3) Heat up a large skillet and melt a generous amount of butter.
4) Saute the spices, chillies and ginger for a few minutes
5) Add onions and saute until translucent.
6) Add the tomatoes and saute until the mixture becomes mushy.
7) Set this mixture aside to cool down.
8) Saute the marinated chicken until they are half cooked.
You should have


9) Blend the tomato-onion mix to a fairly smooth paste.
10) Filter the blended contents using a sieve. This gives the smooth texture of a restaurant style butter chicken gravy. Of course this method can be used for any tomato based gravy.

Phase 2
1) Heat a skillet and melt butter. (Is someone counting calories already?)
2) Sautee the ginger juliennes.
3) Add tomato paste and saute until the oil (er..butter) separates.
4) Add the blended paste and bring to a simmer.
5) Add the cream and bring to a boil.
6) Add a few tea spoons of honey.
7) Add chicken and bring it to a boil.
8) Based on the required thickness of the gravy keep adding water in small quantities.
9) Add the Kasuri Methi leaves and give it a stir.
10) Garnish with coriander leaves and its ready to serve.

A  tip

Instead of doing the chicken thing as mentioned above...a better idea would be to make some tandoori chicken tikka and add it to the gravy.