Sunday, March 10, 2013

Kari Ayam - Malaysian Chicken Curry

Kari Ayam (Chicken Curry in Malaysian) - one of those dishes I have not had much but always wanted to. The problem with going to a favourite Malaysian restaurant after a long time is you end up wanting to eat your regular favourite and not attempt to explore much. This is one of those dishes and I thought of giving it a shot at home.
Kari Ayam as you would see is very much like a South Indian chicken curry - with a south east asian twist. The ingredients that go in make it Indian, Thai and somehow made it to be Malaysian. It is best consumed with Roti Canai or rice - preferably Hunan Chicken Rice.
Ingredients

  1. Chicken - preferred with bones
  2. Star anise
  3. Cinnamon sticks
  4. Shrimp paste
  5. Garam Masala / Curry Powder 
  6. Coconut milk (or cream)
  7. Special Paste
    • Shallot (Small Onion)
    • Red Onion
    • Ginger
    • Garlic
    • Lemon Grass
    • Galanga (optional - used it because I had it already mixed)
Method
  1. Heat oil in a large pan and fry cinnamon, star anise and shrimp paste for a few seconds until you can smell the spices.
  2. Add the "Special Paste" and saute for a few minutes until oil separates.
  3. Add coconut milk and saute for a few minutes.
  4. Add chicken , turmeric powder, garam masala / curry masala ,salt and saute for about 5-10 minutes.
  5. Add coconut milk and water slowly as required to the required amount of consistency and sauce. This dish is usually watery, but you can always choose your own level of consistency.
  6. Add curry leaves to get the extra kick.
  7. Stop cooking when you are able to easily break open a piece of chicken with a fork and nothing pink is visible inside. Key is to stop when the meat is juicy - not hard.
Note: This dish usually has potato in the curry - but I chose not to. Feel free to add large size potato cubes along with the chicken.

Serve hot with rice or roti canai.

Enjoy!!

C

Sunday, August 26, 2012

Spicy Semolina Crepe - a.k.a Rava Dosai

Rava Dosai a typical South Indian favourite was not my favourite dish for a long long time. As a kid, I've always tried every other dosa variety BUT Rava dosai. For some reason the thin crispy crepe never caught my attention until very recently. It is one of those restaurant specialities and definitely not a staple dish that one would eat on a daily basis. The reasons became obvious once you start cooking (and eating) them. It is a painstakingly slow process to cook the dosa (not the batter). The outcome of course is definitely well worth the efforts. This recipe is for those living far away from home and not able to get a decent one at your local desi joint.

Ingredients:
Ingredients

1) Rava (Semolina powder)
2) All purpose flour (Maida)
3) Rice flour
4) Yogurt
5) Ginger
6) Green Chillies
7) Coriander leaves (Cilantro)
8) Curry leaves
9) Cumin seeds 
10) Freshly ground black pepper

You can have some chopped / diced onions for an extra kick, but completely optional.

The Process

Batter
1) Prepare the batter by adding all the dry ingredients in an almost equal ratio. You might want to reduce a bit on the Maida (3/4ths measure of Rava) if you are looking for a crispier outcome. The batter looks so watery, but do not get misled by that consistency. Of course, please add some salt to the batter.


2) Heat a skillet / tava / dosai kal and "pour" the watery mixture once the skillet sizzles on liquid contact. The difference here between a regular dosai and rava dosai is you do not spread the batter on the skillet using a spoon (or a cup as the professionals do). You pour the watery liquid and maybe rotate the skillet so the batter goes around evenly and makes an almost round version.

3) If you are using onions, you need to scatter the chopped onions on the skillet first before pouring the batter.

4) Wait PATIENTLY until the surface turns brown and then flip them over.

As mentioned earlier, if you want it crispier, reduce the maida content and of course a generous amount of oil.

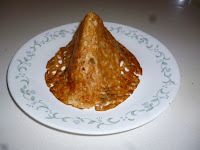
Rava dosai - ready  - to be served with chutney (any variety goes).

Happy Cooking!!

C

Friday, August 10, 2012

Gaeng Daeng Goong -Thai Red Curry with Prawns

Gaeng Daeng Goong or Red Curry with Prawns is yet another staple of Thai curries. When I was first introduced to Thai cuisine I was told that it was the closest I can get to Indian curry (apart from an Indian restaurant). Of course sometimes even Indian restaurants (outside India) don't get close to what actual curries are meant to taste like. If you look at the ingredients used to make the Red Curry, it is no surprise that it tastes like an Indian (South Indian to be precise) curry. Especially the ones such as coriander seeds, cumin seeds, black pepper, garlic. Of course there are a few ingredients that can make any dish Thai - lemon grass, galangal and kaffir lime leaves. You sure can buy the  paste in a store, as with any packaged food, it's just not the same if not made at home. Once done the curry paste can be stored frozen for months and used for a variety of dishes.

Ingredients:

Red Curry Paste

  1. Dry Red Chillies - 20 chillies
  2. Lemon Grass - just the bottom white section finely chopped. - 8 stalks
  3. Coriander stems - 15-20 stems finely diced
  4. Kaffir Lime leaves - 1/2 cup - ensure the middle stalk is removed
  5. Galanga - 200 gms - remove the skin and finely chopped
  6. Garlic - 1 bulb
  7. Ground Coriander, Cumin and Pepper seeds - 1 tablespoon each

Curry

  1. Prawn (or Shrimp if you are in the USA) - 500 gms
  2. Baby corn - 200 gms
  3. Bamboo shoots - 1 can
  4. Curry paste - 4-5 tablespoons
  5. Coconut cream - 1 can
  6. Sugar - 2-3 tea spoons
  7. Fish sauce - 4-5 tablespoons (vegetarians might replace this with salt)
  8. Thai basil leaves - 1/2 cup


The Method

Curry Paste


  1. Soak the dry red chillies in hot water for about 30 minutes. Once soaked  remove the seeds and stalks from the chillies. Make sure you wear gloves for this step.
  2. Blend the ingredients above for the curry paste. I first smashed them in a mortar before transferring the content to a blender. Use minimum water just enough to get the blender going.
  3. Once blended heat a wide sauce pan and pour about 1/4 cup of vegetable oil and sautee the blended paste for about 20-30 minutes until the paste is cooked and oil separates.
  4. You can then freeze the paste (once it has cooled down to room temperature) and store it for a few months.

Prawn Curry

  1. If the curry paste is frozen - first thaw it to room temperature.
  2. Wash the bamboo shoots (from the can) with cold running water to remove the salt content in the can.
  3. In a large wok heat about 4-5 tablespoons  of vegetable oil and saute the curry paste until oil separates.
  4. Add about half of the coconut cream and mix well and bring the mixture to a boil.
  5. Add the baby corn and bamboo shoots and cook for about 5 minutes until the bamboo shoots become tender.
  6. Add the prawns and cook for a few minutes until they curl up and turn pink.
  7. Add the sugar, fish sauce and basil leaves, mix well and simmer for a few minutes.
  8.  Serve hot with steamed jasmine rice.


Happy Cooking !!

C

Friday, July 20, 2012

Gong Bao Ji Ding aka Kung Pao Chicken

Ni Hao!! If you followed my Shanghai Connection it might be obvious on what my next recipe should be. Yes, I have been influenced... Kung Pao Chicken was one of my staple lunch diets at Panda Express at Lloyd Center mall along with Black Pepper chicken and Chowmein. I guess that was the one of the few "spicy" chinese dishes I could have almost anywhere in US. After a few years they came up with Kung Pao Prawns - not sure if they still have it. Anyways...had an opportunity to experiment this out for a few guests at home last week. After a long contemplation between Gong Bao Ji Ding (traditional Chinese name) and Black Pepper, ended up with Gong Bao. 

Ingredients

1) Chicken breast fillets
2)  Raw peanuts (skin less)
3)  Dried Red Chillies
4) Soy Sauce
5) Chinese Cooking Wine
6) Spring onion (bottom white part only)
7) Corn flour
8) Vinegar 
9) Minced Garlic

Of course you can add some red capsicum (bell pepper) to add some colour.

The Method

For a dish that looks simple it's actually a bit of a process involved. It had to be done in different phases.

1) Marinade the the diced chicken breasts in soy sauce with a bit of salt and corn flour powder. 
2)  In a large wok, add a few "generous" tablespoons of oil and fry the red chillies and peanuts for a few minutes. Try not to burn the red chillies. You can stop when you see some brown spots on the peanuts. Strain the fried mixture from the oil and set aside. By this time the wok should've got a nice smoky nutty flavour.
3) In the same oil (please note it has to be the same oil) shallow fry the chicken for a few minutes. Add a dash of vinegar and rice wine as the chicken cooks. You will have to ensure the chicken is cut in such a way that it cooks in a few minutes. Strain the chicken (if you still have excess oil) and set aside.
4) Sautee the garlic and shallots in few tablespoons of oil (use remaining oil if available after frying the chicken).
5) Mix the chicken along with a few dashes of soy sauce, rice wine and vinegar. 
6) After a few tosses with the chicken add the peanut / chilli  mixture and toss it around. If you had some red capsicum now would be a good time. Check and add some salt to taste as required.

Gong Bao Ji Ding ready... 

Serve hot with steamed rice or just by itself as an appetizer.

Happy Cooking!!

C

Wednesday, January 4, 2012

Vegetarian American Chopsuey


American Chopsuey yet another Indo-Chinese delight which you can rarely find anywhere outside India. Niven - this one is for you. :-)  American Chopsuey is neither American nor Chinese. I think my first attempt at eating American Chopsuey is either at China Tower or Golden Dragon. It was a very unique experience to eat "Murukku Noodles" with gravy. Not particularly a huge fan of american chopsuey, but did have it every once in a while including "Chung Wah" in Koramangala. They used to dish out a killer chopsuey with just the right amount of everything.

Technically it is not supposed to be a very complicated dish. Chopsuey is nothing but a Chinese Avial where you put in all left over veggies and make some sauce out of it. The difference with the "American" version is of course the usage of Ketchup.

Ingredients:
1) Boiled noodles. (Do  not use fresh - ready to eat ones).
2) Garlic (thinly sliced)
3) Green chillies
4) Onions, Cabbage and Capsicum - all cut into 1.5 inch wedges
5) Carrots - thinly sliced
6) Baby corn
7) Vinegar
8) Soya sauce
9) Tomato Ketchup
10) Corn flour
12) Seasme oil

The Method
1) Boil the noodles, drain, dust it with corn flour (this is very very important!!)  and set aside.
2) Heat up a wok and pour a few tablespoons of sesame oil.
3) Once fuming add garlic and chillies and sautee for a few seconds.

(If you would like to add any thin slices of meat now would be a good time.)

4) Add the onions and carrots and sautee for a 1-2 minutes.
5) Add a few teaspoons of vinegar.
6) Add cabbage, baby corn and capsicum. Sautee for a few minutes. (Note: Do not let the veggies go too soggy)
7) Add few tablespoons tomato ketchup.
8) Add water as much sauce is needed and bring to a boil.
9) When the water comes to a boil add the corn flour water.
10) Bring the mixture to a boil until the sauce thickens to the required consistency. It should not be too watery or should not be a porridge either.

Tip: If it becomes too sour add a bit of sugar.

....Now comes the tricky part....frying the noodles

11) Heat up a wok with generous amount of oil.
12) Once the oil is hot enough start frying the noodles one handful at a time. Of course you can do more if you have a bigger vessel. This is THE most trickiest part of the recipe. It took a few batches of trial error.
    a) Once you plonk the noodles spread it around so it forms a circle.
    b) Leave it to fry until you hear frequent crackle. Another test is to slightly prod the noodles. If it is soft, it needs further frying. If it is hard enough then flip it over and give it another minute or 2.

13) Fry an egg and keep aside.

14) Place the fried noodles on the plate, pour the veggie sauce over the noodles and top it up with the fried egg. American Chopsuey Ready!!!


Saturday, December 24, 2011

Murgh Makhani aka Butter Chicken

As they say...when it rains it pours. After a long break trying to get back into the groove and catch up on the posts. Niven - Sorry mate Chopsuey is yet to come. :-)

The very first time I "cooked" butter chicken was in Yercaud. We 3 Mustkeers wanted to experiment cooking butter chicken at THE Nanjam. I must've been in my 7th or 8th class at the most. I think we were inspired at that time by many things...can't recall exactly. But we did want to cook "Butter Chicken". We got a whole chicken but a stick through it, lit up a bon fire and started roasting it with by basting loads and loads of Amul butter.  The result of course was a few days of eating Lomotil. It was only after several years did I get to know that Butter Chicken is a staple Punjabi chicken delight. One of the dishes I normally eat to "test the waters" in any new Indian restaurant. If they get this right, they usually have a good chef in place. For a long time I've always thought this is one of those dishes that is best done by a professional. After a bit of research from a few websites was able to get to something pretty close. It does takes a bit of work, but the outcome was worth every minute spent. A word of caution to those who are calorie conscious - this definitely is not a dish for you.

What goes in:
1) Butter
2) Cream
3) Chicken
4) Tomatoes
5) Tomato paste
6) Onions
7) Red chillies
8) Ginger juliennes
9) Ginger & Garlic paste
10) Garam masala spices (Bay leaf, Cinnamon, Star aniseed, green elaichi (most important), cloves, cumin seeds
11) Coriander powder
12) Kasuri Methi. - Wonder what the magic is in that unassuming dried methi leaves.
13) Honey

The process:

Butter chicken has to be done in 2 phases.

Phase 1
1) Make a paste with the following:
   a) Ginger garlic paste
   b) Red Chilli powder
   c) Coriander powder
   d) Salt
2) Marinate the chicken in the above paste.
3) Heat up a large skillet and melt a generous amount of butter.
4) Saute the spices, chillies and ginger for a few minutes
5) Add onions and saute until translucent.
6) Add the tomatoes and saute until the mixture becomes mushy.
7) Set this mixture aside to cool down.
8) Saute the marinated chicken until they are half cooked.
You should have


9) Blend the tomato-onion mix to a fairly smooth paste.
10) Filter the blended contents using a sieve. This gives the smooth texture of a restaurant style butter chicken gravy. Of course this method can be used for any tomato based gravy.

Phase 2
1) Heat a skillet and melt butter. (Is someone counting calories already?)
2) Sautee the ginger juliennes.
3) Add tomato paste and saute until the oil (er..butter) separates.
4) Add the blended paste and bring to a simmer.
5) Add the cream and bring to a boil.
6) Add a few tea spoons of honey.
7) Add chicken and bring it to a boil.
8) Based on the required thickness of the gravy keep adding water in small quantities.
9) Add the Kasuri Methi leaves and give it a stir.
10) Garnish with coriander leaves and its ready to serve.

A  tip

Instead of doing the chicken thing as mentioned above...a better idea would be to make some tandoori chicken tikka and add it to the gravy.

Tuesday, December 20, 2011

Aloo Gobhi

Hello,

Finally BIA at the Kitchen after a "short" break. Aloo Gobhi has been on the agenda for quite some time. Everytime we had aloo there was no gobhi and vice versa. As with any "Northi" / Punjabi dish my memories always begin from Bangalore. In this case the Gurudwara Dhaba in Ulsoor. Can't say I came close to it, but definitely worth repeating. Until a very recently our spice rack was quite "South Indian". Thanks to some of my IGT mates I came to know of a few more tricks to make it more authentic. This time it was Amchur powder which gives the zing.

Ingredients:
1) Aloo (Potato) (1 - 1.5 inch cubes)
2) Phool Gobhi (Cauliflower) florets
3) Minced Garlic
4) Cumin seeds
5) Onions
6) Tomato wedges
7) Amchur powder 
8) Asafoetida
9) Turmeric powder
10) Garam masala (optional)
11) Red chilli powder


Method:

1) Heat a skillet with a "generous" portion of oil.
2) Sautee the garlic and cumin seeds for a quick 20 seconds.
3) Add the potatoes , asafoetida,  turmeric  and roast it. This is the part that requires utmost patience. You can try to cheat by having smaller chunks of potato, but then it may not become Aloo Gobhi!! So patience please. Potato has to be roasted until you can easily cut through it with a spoon. A better test....try to eat it and it shouldn't taste raw. :-) (Duh!!)
4) I made a mistake of adding the onions along with the potatoes. As part of the slow roasting process, the onions became almost charred and I had to fish it out. On the positive side, it gave a pretty good flavour to the potato. So if you haven't added the onions already, now is a good time.
5) Add the Cauliflower florets and most of the tomato wedges (2/3rds maybe..).
6) Stir fry this mix for about 10-15 minutes along with amchur powder, red chilli powder and garam masala  (optinal) until the Cauli is cooked. Indication - should be slightly soggy.
7) Add the remaining tomatoes and stir fry for a couple of minutes.
8) Garnish with chopped coriander (Cilantro) and serve with hot Chappatis.

Aloo Gobhi Ready!!